Tuesday, March 26, 2013

How to Increase the Memory Limit for 32-bit Applications in Windows 64-bit OS


Most of us are now probably using a 64-bit Microsoft Operating System like Windows 7 x64 or Windows Vista x64, which allows the computer to address more than 3GB of RAM. Did you know, however, that any 32-bit applications you run are still limited to making use of only 2GB of RAM? This includes many games and probably the version of Microsoft Office you have installed, unless you specifically opted to install the 64-bit version.
You might wonder why this is a problem. Well, obviously if your system has more than 2GB of RAM, it’d be great to allow your applications or games to make use of it. Furthermore, some applications actually crash when they hit this limit, or start popping up boxes with out of memory errors. If you work on large excel files (500,000 rows+) then you’ll know what I’m talking about.

The Solution

Thankfully, there’s a solution! A great coder by the name of Daniel Pistelli has written a little patching application that will modify your 32-bit programs, and allow them to address up to 4GB of RAM. It’s important to remember that this utility is only useful if you are running a 64-bit OS. If you don’t know what I’m talking about, then here’s an easy way to check:
1. Go to Control Panel, and click view by “small icons” in the top right hand corner
2. Click System
3. As per the image below, next to System Type, it should say 64-bit operating system. If it doesn’t then this utility is of no use to you.
4gbpatch-systeminfo
The second thing to remember is that this utility can only be used on 32-bit applications. If you are unsure if an application you are running is 32-bit, run task manager by pressing CTRL-SHIFT-ESCAPE. Click the tab for processes. A list of currently running programs will load. Find your application in the list, and look to see if it has *32 next to it. The example image below illustrates what I mean.
4gbpatch-taskmanager

Using the patch

Assuming that you’ve followed the previous two points and now wish to patch your 32-bit application, first backup the executable file of the program you wish to patch. If the patching process fails, or if you need to download an update for the program you are patching, you may need to revert to the original file. Remember, you only need to backup the executable file for the program (i.e. the file with a .exe extension), not the entire program folder itself. Once you’ve done this, download the patching utility from here. Run it, and it will ask you to select your program. Simply select the executable file you wish to patch and the utility will work its magic. Upon completion, it will ask you if you wish to patch another file. If you do, go ahead, if not, quit!
4gbpatch-patch

Conclusion

If all goes well, your application should now be able to make use of up to 4GB of RAM. Obviously this will be most useful for resource-intensive applications, and you’ll probably see the greatest benefits with games. Some productivity software will also benefit, assuming you aren’t utilising the 64-bit versions of these (e.g. Excel, Photoshop, 3D Studio Max, and so on.)


Tq so much.  http://maketecheasier.com

Thursday, January 10, 2013

How to using the WorldWind Java 0.2 SDK in Netbeans IDE 7.2.1


  • Visit http://goworldwind.org/ and do some research about what WW really is and why you should use it.
  • Follow the getting started tutorial to get familiar with the examples.
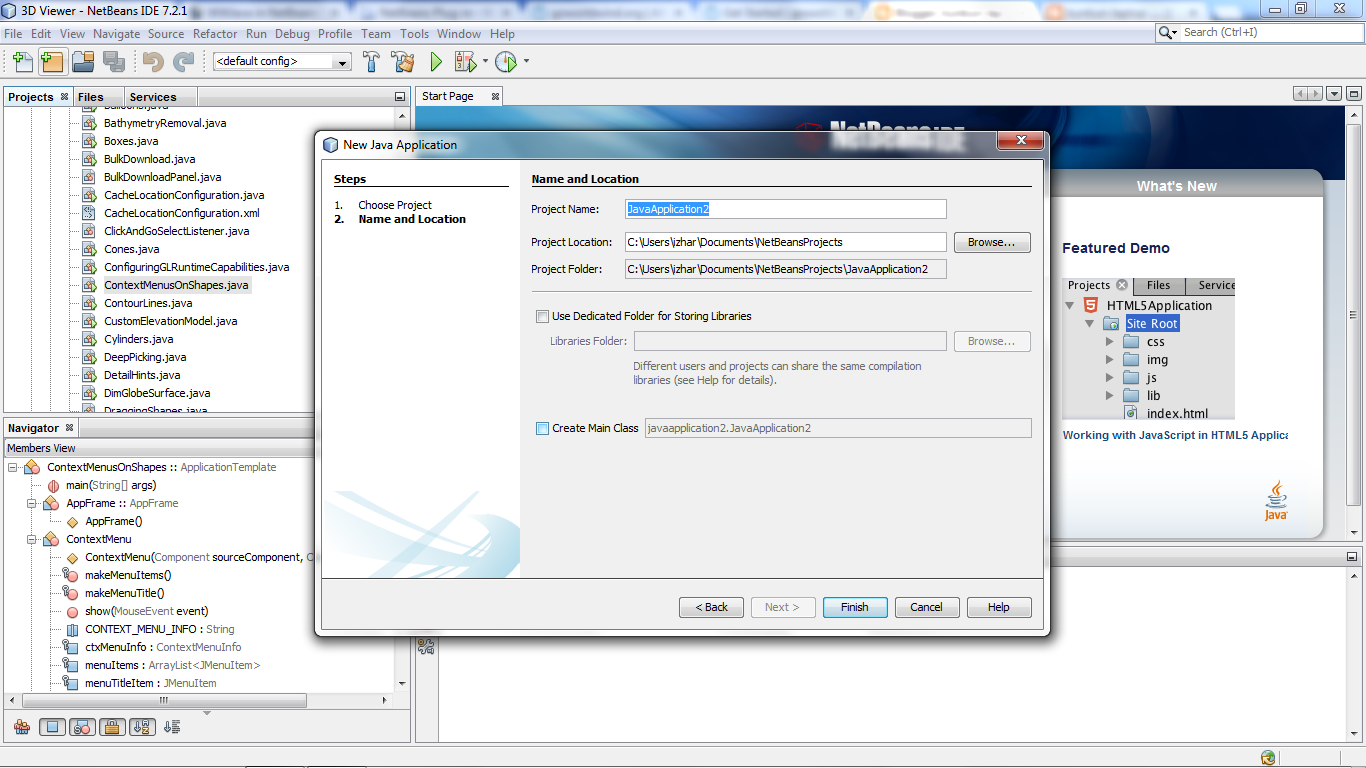
  • Open NetBeans and create a New Project using the "Java Application" template. Fill in the required details but uncheck the 'Create Main class' box. Your new project should reside in a clean directory.

  • In the src you downloaded from the release site and extracted, rename WorldWind's'build.xml' to something else (build_ww.xml) and copy all the WorldWind's unzipped content to your NetBeans project folder so that the src folders overlap. You should end up with a folder structure very similar to the WorldWind unzipped folder, plus a'nbproject' and a 'test' folders. The 'build.xml' file is the one created by NetBeans, not the one that came with the zip (which is why we renamed it earlier).
  • From NetBeans, you will notice that some folders/classes are marked with a red exclamation mark. We now need to tell the project about the required libraries. Right-click your project's node and select 'Properties' (typically the last menu item). Select the 'Libraries' node from the Categories tree and press the 'Add JAR/folder' button on the right. Keeping CTRL down, select the 'gluegen-rt.jar','jogl.jar''gdal.jar' and 'plugin.jar' that are now inside your project folder. Click 'ok'.

                                             
  • You can now run any of the examples by right-clicking them and selecting 'Run File' from the contextual menu.


Thanks. ;) http://forum.worldwindcentral.com/showthread.php?t=32347

Tuesday, January 8, 2013

Extrude in TatukGIS Editor 3

How to using the WorldWind Java 0.2 SDK in Eclipse


Step 1: Download and unzip

Grab the code from sourceforge, it's a zip. Unzip it someplace. I unzipped it to c:\software\dev\worldwind.release You'll see that path later.

[edit]Step 2: Start Eclipse and create a New Java Project

Start Eclipse and to to File -> New -> Project. Choose a Java Project.


[edit]Step 3: Point to the existing source code

In the new project wizard, make sure to select "Create project from existing source" and point to the unzipped directory. Then press "Finish."


Done! That was easy. Not like the steps needed for the 0.1 code! Major kudos to the NASA Java team for including JOGL and having a nice directory structure that allows Eclipse to interpret where things are.
Checking the project's settings, we see the libraries have been included:


Here's a shot of Eclipse, running the two demo apps that come with it, worldwinddemo.AWT1Up in the foreground, worldwinddemo.BasicDemo in the background.
To run one of these apps, navigate to src/worldwinddemo/ on the right hand Package Explorer and right click on one of the java classes. In the context menu that appears, go to Run As... and choose Java Application.
There're some interesting things here, first there's a floating placemark (neat), second there's a GML line (also neat) in AWT1Up, and third zooming is all shaky and wierd (bad).


Here's the snippet that produces the icons along the equator, with a 2m meter ones at every 90.
private IconLayer buildIconLayer()
{
   IconLayer layer = new IconLayer();

   for (double lat = 0; lat < 10; lat += 10)
   {
       for (double lon = -180; lon < 180; lon += 10)
       {
           double alt = 0;
           if (lon % 90 == 0)
               alt = 2000000;
           WWIcon icon = new UserFacingIcon("images/32x32-icon-nasa.png",
               new Position(Angle.fromDegrees(lat), Angle.fromDegrees(lon), alt));
           icon.setHighlightScale(1.5);
           icon.setToolTipFont(this.makeToolTipFont());
           icon.setToolTipText(icon.getPath());
           icon.setToolTipTextColor(java.awt.Color.YELLOW);
           layer.addIcon(icon);
       }
   }

   return layer;
}


Thanks http://www.worldwindcentral.com/wiki/WWJava_in_Eclipse

Monday, October 24, 2011

How to Virtualize OS X Lion on Windows

Update: Sorry about the delay guys, this page has been updated so that Xcode 4.1 does not crash anymore. (August 17, 2011).

If you've tried to virtualize previous versions of OS X, you know that it is a very tedious and time consuming process. This new guide works by giving you a simple VMWare Image. This means that the OS has already been pre-configured on a hard drive. For the most part, there is no need to mess around with boot flags or installation settings

This guide will show how to setup a fully working OS X Lion 10.7 on a Windows machine. This process will take about an hour but most of the time is spent downloading files. This was done on Windows 7 but should work on any OS as long as it meets the requirements.

Requirements
A laptop or desktop computer that supports virtualization (most newer computers do).
At least 1 GB of RAM (the more, the better).
VMWare Workstation (this is a paid program but a little research will get you it for free).
VMWare Hard Drive (vmx files, it is in a self-extracting .exe file) Here is a mirror in case that one isn't working anymore.
OS X Lion (VMDK File)

Instructions

Before you start, make sure that you have enabled Virtualization in the BIOS of your computer. This is usually disabled by default by computer manufacturers.

An updated video has been made of all the new steps:


1. From the file downloaded, double click on Mac OS X Lion VMware Files.exe. Click Run thenYes. This will decompress the files.


2. Once done, a folder named Mac OS X Lion VMware Files will appear, double click it.


3. You will need to follow the instructions in this video to unlock VMWare. Instead of using the files from the video, use the files from Step 2.


4. From Step 1, you should have also gotten a folder named Mac OS X Lion. Open that up and open the file named Mac OS X Lion.vmx. Double-click this file. It will open in VMWare Workstation.


5. On the left column, click on Edit Virtual Machine Settings. In the Memory tab, you can edit how much RAM OS X will get. In the Sound tab, change to Specify host sound card, change it to your sound card. After the machine has started and sound doesn't work, change to Use default host sound card.


6. At the bottom of the box is an Add button, click it. Select Hard Disk from the left, click Next. Choose Use and existing virtual disk.


7. Browse for the Mac OS X Lion Installer.vmdk that was downloaded from the torrent. ClickFinish. Click OK to close the box.


8. On the left column, click Power on this virtual machine.


9. If a box asks to repair the image, click Repair. Once the box comes up, click I copied it, clickOK. A message about the CD Drive may come up, just click OK.


10. The machine should power up in a few moments, ready to go. For ease of use, click in VMWare Workstation, click File > Add to Favorites.

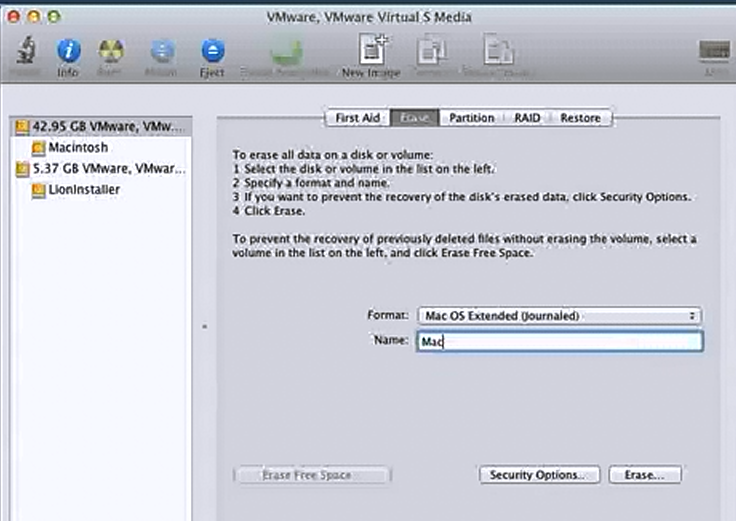
11. You should now have a Install Mac OS X screen. At the top, click Utilities then Disk Utility. Select the 42.45 GB Hard Disk. Click on the Erase tab. Now you can name your hard drive what you want. Then click on Erase. Click Erase again.


12. Once the process is done, close out of the Disk Utility box, the Install screen will come back up. Click Continue, Agree. Select the 40GB Hard Disk to install Lion. Click Install. The process will take about 30 minutes. Once it's done, the account setup will start. Once that's done, Lion will start.

13. To be able to use the machine in full screen, in OS X open Preferences, click on Displays. Now select the resolution of your monitor. Now in VMWare, click on the Full Screen button on the toolbar (10th button from the left).


14. Now you're done, you can use this OS as a normal to install programs.

How to Install iOS SDK and Xcode on Windows 7

Update 2: August 17, 2011 The TechExxpert guide has been updated to fully allow Xcode 4.1 to work. Sorry that the past fixes did not work. Thanks for the comments! Please let me know if this guide works/doesn't work.

Update: This guide has been modified to the latest updates as of August 2, 2011 including the latest Xcode 4.1 and OS X Lion 10.7.

Apple has been adamantly refusing to create an iPhone SDK support for Windows-based machines. Luckily, there is a work around to be able to fully run the iOS SDK and Xcode support for most all PC's.

The following steps involve installing a virtual machine on your PC, updating the virtual machine to 10.7 , then running the machine and downloading and installing the iOS SDK and Xcode on to the virtual machine.

There are other ways to install OS X on your machine but they involve creating a new partition and installing the Operating System directly to your hard drive. Those ways are much harder and have more confusing steps that could potentially damage your computer. This method is easier and safer to use.

The process will take 2-3 hours, but most of the time is consumed by large downloads. There's no software to buy or developer fees to pay.

Instructions

1. Follow the steps
here to download and install a virtualized version of OS X Lion on your PC.

2. If you don't have a free Apple Dev Account, create one
here. You'll need this to be able to download Xcode 4.1 for free. In OS X, open the App Store and download Xcode. You can view progress of the download under the Purchases tab.


3. Once the progress bar is finished, it will say it is installed but it really isn't. Open the
Applications folder from Finder. Double-click on the Install Xcode icon.


4. Follow the on-screen directions then wait for the installation to finish.


6. Once it's done, it should open by itself. If it doesn't, you will
NOT find the iPhone SDK in your dock. You will need to open your hard drive. Then Click on Developer, then on Applications.


7. You will now see an icon for Xcode, click it and you can start coding applications.

If the icons don't show up, you may not have enough virtual hard drive space to fit the program. Make sure you have at least 10 GB of free memory in the virtual machine. Restarting your machine may be another way to make the icon appear.

Now you can start coding an app for your personal use. The language you will be coding in is Objective-C. If you don't have any experience with Objective-C, TheNewBoston provides free tutorials on
Xcode and Xcode iPhone development. I recommend following the Objective-C tutorials
first.

You will be able to test your app on the iPhone simulator in Xcode but you will not be able to add the app to your own device. To add an app that you've created to your device, see the two options below.

Option 1:
If you want to submit your app to the App Store, you will need to pay Apple $100 for an official Developers Certificate. This will allow you to sell your app to a very large audience but Apple does place large restrictions on its approval of submissions.

Option 2:
If you don't want to pay the $100, you can develop your application for Cydia (similar to the App Store). This option will also allow you to place your app on to your iPhone, not just only in the Xcode simulator.

Cydia is the unofficial App Store for users who have jailbroken and want to sell/share their apps. There are almost no restrictions as to what kind of apps that can be added to Cydia.

Tq http://ipodtoucher55.blogspot.com

Thursday, October 13, 2011

How to add BlackBerry Java Plug-in for Eclipse Update Site

Installation instructions

If you’re using Java® 2 SDK, Standard Edition v6.0, obtain Update 16 of the Java 2 SDK v6.0 from the Oracle® website before downloading the plug-in using the Eclipse Update Mechanism.

  1. From the Help menu, select Install New Software to open the Install window.
  2. Click the Add button:
    1. In the Add Site dialog, type the URLhttp://www.blackberry.com/go/eclipseUpdate/3.6/javainto the location text box and specify BlackBerry Java Plug-in Update Site in the name text box.
    2. Click the OK button, BlackBerry Update Site appears in the Available Software list.
  3. Select the BlackBerry Java Plug-in item and at least one BlackBerry Component Pack item you want to work on.
  4. Click the Next button.
  5. Click the Next button after reviewing the items to be installed.
  6. Check the I accept the terms of the license agreement radio button after reviewing licenses.
  7. Click the Finish button to begin installation.
  8. Note: you'll need to enter your BlackBerry® Developer Zone login ID and password in an authentication dialog. Due to security policy, you may be authenticated multiple times. If you don’t have a BlackBerry Developer Zone login, register for access to the BlackBerry Developer Zone.
  9. After successfully downloading the files, you’ll be prompted to restart the Eclipse Platform. Choose to restart the platform.

Software versions (new updates available as of May 31, 2011)

To verify you’re using the latest version of the BlackBerry Java Plug-in for Eclipse or BlackBerry Java SDK:

  1. In Eclipse, go to Help and select About Eclipse.
  2. Click on Installation Details.
  3. Under the Installed Software Tab, check to see if you have the latest versions:
    • BlackBerry Java SDK v7.0 (updated May 31, 2011)
    • BlackBerry Java SDK v5.0.0.25
    • BlackBerry Java SDK v4.7.0.57 (updated July 9, 2010)
    • BlackBerry Java SDK v4.6.1.49 (updated July 9, 2010)
    • BlackBerry Java SDK v4.6.0.23 (updated July 9, 2010)
    • BlackBerry Java SDK v4.5.0.28 (updated July 9, 2010)

Technical requirements

  • Eclipse 3.6 Helios
  • 32-bit Windows® XP or Windows 7 (Note: 64-bit versions require 32-bit Java and Eclipse)
  • Monitor with a resolution of 1024 x 768 or higher
  • PC with Intel® Pentium® 4 processor or compatible (2.5 GHz or higher, 2 GB RAM, 1.5 GB HD free)
  • Java SE Development Kit (JDK) 6, update 14 or later


Saturday, October 8, 2011

How to Install Ubuntu inside Windows using VirtualBox

The first thing you have to do is obtain VirtualBox. Visit the VirtualBox website's download page.

Follow these instructions to get a Ubuntu disk image (.iso file).


After you launch VirtualBox from the Windows Start menu, click on New to create a new virtual machine. When the New Virtual Machine Wizard appears, click Next.


You can call the machine whatever you want. If you're installing Ubuntu, it makes sense to call it Ubuntu, I guess. You should also specify that the operating system is Linux.


VirtualBox will try to guess how much of your memory (or RAM) to allocate for the virtual machine. If you have 1 GB or less of RAM, I would advise you stick with the recommendation. If, however, you have over 1 GB, about a quarter your RAM or less should be fine. For example, if you have 2 GB of RAM, 512 MB is fine to allocate. If you have 4 GB of RAM, 1 GB is fine to allocate. If you have no idea what RAM is or how much of it you have, just go with the default.

Click Next.


If this is your first time using VirtualBox (which it probably is if you need a tutorial on how to use it), then you do want to Create new hard disk and then click Next.


Click Next again.


Theoretically, a dynamically expanding virtual hard drive is best, because it'll take up only what you actually use. I have come upon weird situations, though, when installing new software in a virtualized Ubuntu, in which the virtual hard drive just fills up instead of expanding. So I would actually recommend picking a Fixed-size storage.


Ubuntu's default installation is less than 4 GB. If you plan on adding software or downloading large files in your virtualized UBuntu, you should tack on some buffer.


Click Finish and wait for the virtual hard drive to be created. This is actually just a very large file that lives inside of your Windows installation.


Click Finish


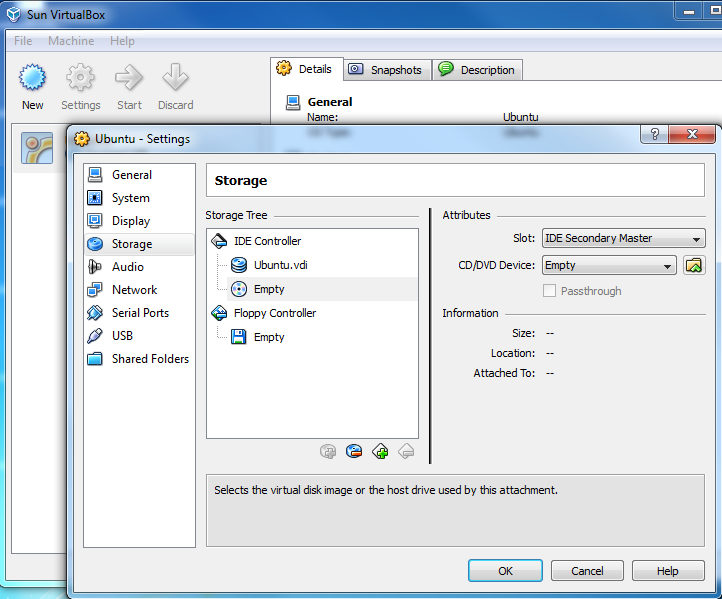
The next thing to do to make the (currently blank) virtual hard drive useful is to add the downloaded Ubuntu disk image (the .iso) boot on your virtual machine. Click on Settingsand Storage. Then, under CD/DVD Device, next to Empty, you'll see a little folder icon. Click that, and you can select the Ubuntu .iso you downloaded earlier.


Once you've selected it, click OK.

Then double-click your virtual machine to start it up.


Once it's started up, just follow the regular installation procedure as if you were installing Ubuntu on a real hard drive (instead of a virtual one).


Afterwards, in order to use your virtualized installation (instead of continually booting the live CD), you have to change the CD/DVD Device entry to be Empty again.


Tq http://www.psychocats.net

Friday, September 16, 2011

How to install Google Chrome on Ubuntu 11.04

Installing Google Chrome on Ubuntu 11.04

Google Chrome can be installed in many ways, on Ubuntu 11.04. Here I’ll explain few simple methods. You can also install Chromium (almost similar to Google Chrome), it is available in Ubuntu Software Center or Synaptic Package Manager. Just follow the steps -

step #1 : Go to its official website and download the Debian Package. Google Chrome version 10.x.* is the latest one.

Download the Google Chrome for Ubuntu 11.04

step #2 : Open the saved file with Ubuntu Software Center (Right Click on the Package, then select Open With USC; click on install Button to proceed) or Use the dpkg command to install the package. To install from the command line, type the command given below and enter your login password to proceed.

sudo dpkg -i google-chrome-stable_current_i386.deb

step #3 : That’s all.. No more steps.. Enjoy surfing with Chrome.

Why svchost.exe running in Windows?

Why Are There So Many svchost.exes Running?

If you’ve ever taken a look at the Services section in control panel you might notice that there are a Lot of services required by Windows. If every single service ran under a single svchost.exe instance, a failure in one might bring down all of Windows… so they are separated out.

Those services are organized into logical groups, and then a single svchost.exe instance is created for each group. For instance, one svchost.exe instance runs the 3 services related to the firewall. Another svchost.exe instance might run all the services related to the user interface, and so on.

So What Can I Do About It?

You can trim down unneeded services by disabling or stopping the services that don’t absolutely need to be running. Additionally, if you are noticing very heavy CPU usage on a single svchost.exe instance you can restart the services running under that instance.

The biggest problem is identifying what services are being run on a particular svchost.exe instance… we’ll cover that below.

If you are curious what we’re talking about, just open up Task Manager and check the “Show processes from all users” box:

image

Checking From the Command Line (Vista or XP Pro)

If you want to see what services are being hosted by a particular svchost.exe instance, you can use the tasklist command from the command prompt in order to see the list of services.

tasklist /SVC

image

The problem with using the command line method is that you don’t necessarily know what these cryptic names refer to.

Checking in Task Manager in Vista

You can right-click on a particular svchost.exe process, and then choose the “Go to Service” option.

image

This will flip over to the Services tab, where the services running under that svchost.exe process will be selected:

image

The great thing about doing it this way is that you can see the real name under the Description column, so you can choose to disable the service if you don’t want it running.

Using Process Explorer in Vista or XP

You can use the excellent Process Explorer utility from Microsoft/Sysinternals to see what services are running as a part of a svchost.exe process.

Hovering your mouse over one of the processes will show you a popup list of all the services:

image

Or you can double-click on a svchost.exe instance and select the Services tab, where you can choose to stop one of the services if you choose.

image

Disabling Services

Open up Services from the administrative tools section of Control Panel, or typeservices.msc into the start menu search or run box.

Find the service in the list that you’d like to disable, and either double-click on it or right-click and choose Properties.

image

Change the Startup Type to Disabled, and then click the Stop button to immediately stop it.

image

You could also use the command prompt to disable the service if you choose. In this command “trkwks” is the Service name from the above dialog, but if you go back to the tasklist command at the beginning of this article you’ll notice you can find it there as well.

sc config trkwks start= disabled

Hopefully this helps somebody!


kunkun-laptop .... ;)