If you've tried to virtualize previous versions of OS X, you know that it is a very tedious and time consuming process. This new guide works by giving you a simple VMWare Image. This means that the OS has already been pre-configured on a hard drive. For the most part, there is no need to mess around with boot flags or installation settings
This guide will show how to setup a fully working OS X Lion 10.7 on a Windows machine. This process will take about an hour but most of the time is spent downloading files. This was done on Windows 7 but should work on any OS as long as it meets the requirements.
Requirements
A laptop or desktop computer that supports virtualization (most newer computers do).
At least 1 GB of RAM (the more, the better).
VMWare Workstation (this is a paid program but a little research will get you it for free).
VMWare Hard Drive (vmx files, it is in a self-extracting .exe file) Here is a mirror in case that one isn't working anymore.
OS X Lion (VMDK File)
Instructions
Before you start, make sure that you have enabled Virtualization in the BIOS of your computer. This is usually disabled by default by computer manufacturers.
An updated video has been made of all the new steps:
1. From the file downloaded, double click on Mac OS X Lion VMware Files.exe. Click Run thenYes. This will decompress the files.

2. Once done, a folder named Mac OS X Lion VMware Files will appear, double click it.
3. You will need to follow the instructions in this video to unlock VMWare. Instead of using the files from the video, use the files from Step 2.
4. From Step 1, you should have also gotten a folder named Mac OS X Lion. Open that up and open the file named Mac OS X Lion.vmx. Double-click this file. It will open in VMWare Workstation.

5. On the left column, click on Edit Virtual Machine Settings. In the Memory tab, you can edit how much RAM OS X will get. In the Sound tab, change to Specify host sound card, change it to your sound card. After the machine has started and sound doesn't work, change to Use default host sound card.

6. At the bottom of the box is an Add button, click it. Select Hard Disk from the left, click Next. Choose Use and existing virtual disk.

7. Browse for the Mac OS X Lion Installer.vmdk that was downloaded from the torrent. ClickFinish. Click OK to close the box.

8. On the left column, click Power on this virtual machine.

9. If a box asks to repair the image, click Repair. Once the box comes up, click I copied it, clickOK. A message about the CD Drive may come up, just click OK.

10. The machine should power up in a few moments, ready to go. For ease of use, click in VMWare Workstation, click File > Add to Favorites.
11. You should now have a Install Mac OS X screen. At the top, click Utilities then Disk Utility. Select the 42.45 GB Hard Disk. Click on the Erase tab. Now you can name your hard drive what you want. Then click on Erase. Click Erase again.
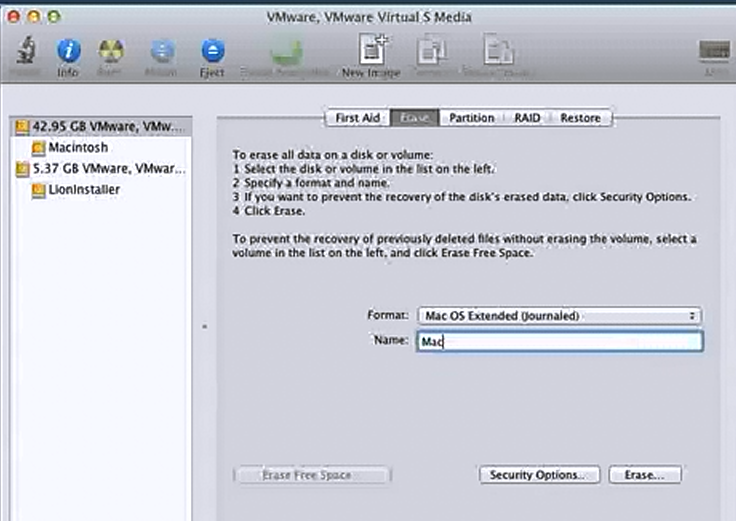
12. Once the process is done, close out of the Disk Utility box, the Install screen will come back up. Click Continue, Agree. Select the 40GB Hard Disk to install Lion. Click Install. The process will take about 30 minutes. Once it's done, the account setup will start. Once that's done, Lion will start.
13. To be able to use the machine in full screen, in OS X open Preferences, click on Displays. Now select the resolution of your monitor. Now in VMWare, click on the Full Screen button on the toolbar (10th button from the left).

14. Now you're done, you can use this OS as a normal to install programs.