Showing posts with label install. Show all posts

Monday, October 24, 2011

How to Install iOS SDK and Xcode on Windows 7

Update 2: August 17, 2011 The TechExxpert guide has been updated to fully allow Xcode 4.1 to work. Sorry that the past fixes did not work. Thanks for the comments! Please let me know if this guide works/doesn't work.

Update: This guide has been modified to the latest updates as of August 2, 2011 including the latest Xcode 4.1 and OS X Lion 10.7.

Apple has been adamantly refusing to create an iPhone SDK support for Windows-based machines. Luckily, there is a work around to be able to fully run the iOS SDK and Xcode support for most all PC's.

The following steps involve installing a virtual machine on your PC, updating the virtual machine to 10.7 , then running the machine and downloading and installing the iOS SDK and Xcode on to the virtual machine.

There are other ways to install OS X on your machine but they involve creating a new partition and installing the Operating System directly to your hard drive. Those ways are much harder and have more confusing steps that could potentially damage your computer. This method is easier and safer to use.

The process will take 2-3 hours, but most of the time is consumed by large downloads. There's no software to buy or developer fees to pay.

Instructions

1. Follow the steps
here to download and install a virtualized version of OS X Lion on your PC.

2. If you don't have a free Apple Dev Account, create one
here. You'll need this to be able to download Xcode 4.1 for free. In OS X, open the App Store and download Xcode. You can view progress of the download under the Purchases tab.


3. Once the progress bar is finished, it will say it is installed but it really isn't. Open the
Applications folder from Finder. Double-click on the Install Xcode icon.


4. Follow the on-screen directions then wait for the installation to finish.


6. Once it's done, it should open by itself. If it doesn't, you will
NOT find the iPhone SDK in your dock. You will need to open your hard drive. Then Click on Developer, then on Applications.


7. You will now see an icon for Xcode, click it and you can start coding applications.

If the icons don't show up, you may not have enough virtual hard drive space to fit the program. Make sure you have at least 10 GB of free memory in the virtual machine. Restarting your machine may be another way to make the icon appear.

Now you can start coding an app for your personal use. The language you will be coding in is Objective-C. If you don't have any experience with Objective-C, TheNewBoston provides free tutorials on
Xcode and Xcode iPhone development. I recommend following the Objective-C tutorials
first.

You will be able to test your app on the iPhone simulator in Xcode but you will not be able to add the app to your own device. To add an app that you've created to your device, see the two options below.

Option 1:
If you want to submit your app to the App Store, you will need to pay Apple $100 for an official Developers Certificate. This will allow you to sell your app to a very large audience but Apple does place large restrictions on its approval of submissions.

Option 2:
If you don't want to pay the $100, you can develop your application for Cydia (similar to the App Store). This option will also allow you to place your app on to your iPhone, not just only in the Xcode simulator.

Cydia is the unofficial App Store for users who have jailbroken and want to sell/share their apps. There are almost no restrictions as to what kind of apps that can be added to Cydia.

Tq http://ipodtoucher55.blogspot.com

Saturday, October 8, 2011

How to Install Ubuntu inside Windows using VirtualBox

The first thing you have to do is obtain VirtualBox. Visit the VirtualBox website's download page.

Follow these instructions to get a Ubuntu disk image (.iso file).


After you launch VirtualBox from the Windows Start menu, click on New to create a new virtual machine. When the New Virtual Machine Wizard appears, click Next.


You can call the machine whatever you want. If you're installing Ubuntu, it makes sense to call it Ubuntu, I guess. You should also specify that the operating system is Linux.


VirtualBox will try to guess how much of your memory (or RAM) to allocate for the virtual machine. If you have 1 GB or less of RAM, I would advise you stick with the recommendation. If, however, you have over 1 GB, about a quarter your RAM or less should be fine. For example, if you have 2 GB of RAM, 512 MB is fine to allocate. If you have 4 GB of RAM, 1 GB is fine to allocate. If you have no idea what RAM is or how much of it you have, just go with the default.

Click Next.


If this is your first time using VirtualBox (which it probably is if you need a tutorial on how to use it), then you do want to Create new hard disk and then click Next.


Click Next again.


Theoretically, a dynamically expanding virtual hard drive is best, because it'll take up only what you actually use. I have come upon weird situations, though, when installing new software in a virtualized Ubuntu, in which the virtual hard drive just fills up instead of expanding. So I would actually recommend picking a Fixed-size storage.


Ubuntu's default installation is less than 4 GB. If you plan on adding software or downloading large files in your virtualized UBuntu, you should tack on some buffer.


Click Finish and wait for the virtual hard drive to be created. This is actually just a very large file that lives inside of your Windows installation.


Click Finish


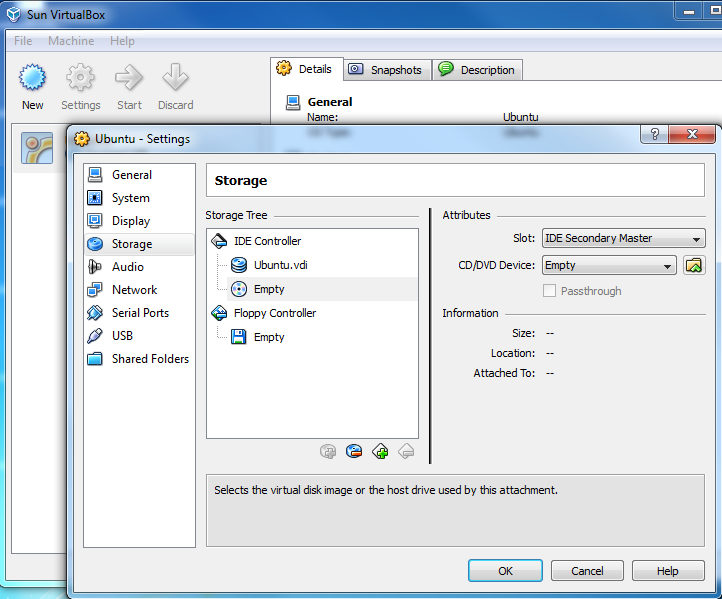
The next thing to do to make the (currently blank) virtual hard drive useful is to add the downloaded Ubuntu disk image (the .iso) boot on your virtual machine. Click on Settingsand Storage. Then, under CD/DVD Device, next to Empty, you'll see a little folder icon. Click that, and you can select the Ubuntu .iso you downloaded earlier.


Once you've selected it, click OK.

Then double-click your virtual machine to start it up.


Once it's started up, just follow the regular installation procedure as if you were installing Ubuntu on a real hard drive (instead of a virtual one).


Afterwards, in order to use your virtualized installation (instead of continually booting the live CD), you have to change the CD/DVD Device entry to be Empty again.


Tq http://www.psychocats.net

Friday, September 16, 2011

How to install Google Chrome on Ubuntu 11.04

Installing Google Chrome on Ubuntu 11.04

Google Chrome can be installed in many ways, on Ubuntu 11.04. Here I’ll explain few simple methods. You can also install Chromium (almost similar to Google Chrome), it is available in Ubuntu Software Center or Synaptic Package Manager. Just follow the steps -

step #1 : Go to its official website and download the Debian Package. Google Chrome version 10.x.* is the latest one.

Download the Google Chrome for Ubuntu 11.04

step #2 : Open the saved file with Ubuntu Software Center (Right Click on the Package, then select Open With USC; click on install Button to proceed) or Use the dpkg command to install the package. To install from the command line, type the command given below and enter your login password to proceed.

sudo dpkg -i google-chrome-stable_current_i386.deb

step #3 : That’s all.. No more steps.. Enjoy surfing with Chrome.

Thursday, September 15, 2011

How to Install Ubuntu Netbook Edition with Wubi Installer

Ubuntu is one of the most popular versions of Linux, and their Netbook Remix edition is especially attractive for netbook owners. Here we’ll look at how you can easily try out Ubuntu on your netbook without a CD/DVD drive.

Netbooks, along with the growing number of thin, full powered laptops, lack a CD/DVD drive. Installing software isn’t much of a problem since most programs, whether free or for-pay, are available for download. Operating systems, however, are usually installed from a disk. You can easily install Windows 7 from a flash drive with our tutorial, but installing Ubuntu from a USB flash drive is more complicated. However, using Wubi, a Windows installer for Ubuntu, you can easily install it directly on your netbook and even uninstall it with only a few clicks.

Getting Started

Download and run the Wubi installer for Ubuntu (link below). In the installer, select the drive you where you wish to install Ubuntu, the size of the installation (this is the amount dedicated to Ubuntu; under 20Gb should be fine), language, username, and desired password. Also, from the Desktop environment menu, select Ubuntu Netbook to install the netbook edition. Click Install when your settings are correct.

sshot-434

Wubi will automatically download the selected version of Ubuntu and install it on your computer.

sshot-437

Windows Firewall may ask if you want to unblock Wubi; select your network and click Allow access.

sshot-438

The download will take around an hour on broadband, depending on your internet connection speed. Once the download is completed, it will automatically install to your computer. If you’d prefer to have everything downloaded before you start the install, download the ISO of Ubuntu Netbook edition (link below) and save it in the same folder as Wubi.

image

Then, when you run Wubi, select the netbook edition as before and click Install. Wubi will verify that your download is valid, and will then proceed to install from the downloaded ISO. This install will only take about 10 minutes.

sshot-443

Once the install is finished you will be asked to reboot your computer. Save anything else you’re working on, and then reboot to finish setting up Ubuntu on your netbook.

sshot-444

When your computer reboots, select Ubuntu at the boot screen. Wubi leaves the default OS as Windows 7, so if you don’t select anything it will boot into Windows 7 after a few seconds.

sshot-547

Ubuntu will automatically finish the install when you boot into it the first time. This took about 12 minutes in our test.

sshot-554

When the setup is finished, your netbook will reboot one more time. Remember again to select Ubuntu at the boot screen. You’ll then see a second boot screen; press your Enter key to select the default.

sshot-2010-05-17-[11-36-08]

Ubuntu only took less than a minute to boot in our test. When you see the login screen, select your name and enter your password you setup in Wubi. Now you’re ready to start exploring Ubuntu Netbook Remix.

sshot-2010-05-17-[11-38-48]

Using Ubuntu Netbook Remix

Ubuntu Netbook Remix offers a simple, full-screen interface to take the best advantage of netbooks’ small screens. Pre-installed applications are displayed in the application launcher, and are organized by category. Click once to open an application.

image

The first screen on the application launcher shows your favorite programs. If you’d like to add another application to the favorites pane, click the plus sign beside its icon.

image

Your files from Windows are still accessible from Ubuntu Netbook Remix. From the home screen, select Files & Folders on the left menu, and then click the icon that says something like 100GB Filesystem under the Volumes section.

image

Now you’ll be able to see all of your files from Windows. Your user files such as documents, music, and pictures should be located in Documents and Settings in a folder with your user name.

image

You can also easily install a variety of free applications via the Software Installer.

image

Connecting to the internet is also easy, as Ubuntu Netbook Remix automatically recognized the WiFi adaptor on our test netbook, a Samsung N150. To connect to a wireless network, click the wireless icon on the top right of the screen and select the network’s name from the list.

image

And, if you’d like to customize your screen, right-click on the application launcher and selectChange desktop background.

image

Choose a background picture you’d like.

image

Now you’ll see it through your application launcher. Nice!

image

Most applications are opened full-screen. You can close them by clicking the x on the right of the program’s name.

image

You can also switch to other applications from their icons on the top left. Open the home screen by clicking the Ubuntu logo in the far left.

image

Changing Boot Options

By default, Wubi will leave Windows as the default operating system, and will give you 10 seconds at boot to choose to boot into Ubuntu. To change this, boot into Windows and enter Advanced system settings in your start menu search.

image

In this dialog, click Settings under Startup and Recovery.

image

From this dialog, you can select the default operating system and the time to display list of operating systems. You can enter a lower number to make the boot screen appear for less time.

image

And if you’d rather make Ubuntu the default operating system, select it from the drop-down list.

image

Uninstalling Ubuntu Netbook Remix

If you decide you don’t want to keep Ubuntu Netbook Remix on your computer, you can uninstall it just like you uninstall any normal application. Boot your computer into Windows, open Control Panel, click Uninstall a Program, and enter ubuntu in the search box. Select it, and click Uninstall.

image

Click Uninstall at the prompt. Ubuntu uninstalls very quickly, and removes the entry from the bootloader as well, so your computer is just like it was before you installed it.

sshot-2010-05-17-[11-51-59]

Conclusion

Ubuntu Netbook Remix offers an attractive Linux interface for netbooks. We enjoyed trying it out, and found it much more user-friendly than most Linux distros. And with the Wubi installer, you can install it risk-free and try it out on your netbook. Or, if you’d like to try out another alternate netbook operating system, check out our article on Jolicloud, another new OS for netbooks.

Links

Download Wubi Installer for Windows

Download Ubuntu Netbook Edition


Monday, September 12, 2011

How to Universal USB Installer – Easy as 1 2 3

Universal USB Installer is a Live Linux USB Creatorthat allows you to choose from a selection of Linux Distributions to put on your USB Flash Drive. The Universal USB Installer is easy to use. Simply choose a Live Linux Distribution, the ISO file, your Flash Drive and, Click Install. Other features include; Persistence (if available), and the ability to fat32 format the flash drive (recommended) to ensure a clean install. Upon completion, you should have a ready to run bootable USB Flash Drive with your select Linux version installed.

Universal USB Installer (UUI) Screenshots

Universal USB Installer Steps
Universal USB Installer - Progress Window

Universal-USB-Installer-1.8.6.3.exe – September 7, 2011 – Changes

Updated to use newer syslinux for UBCD, Added Leenux, Uberstudent, and OpenSUSE 11.4 LXDE entries.


Tq http://www.pendrivelinux.com

Monday, August 22, 2011

How to Install USB Modem (Huawei E220) for CELCOM

Step by Step Installation and Settings

installation of celcom usb modem mobile connect step 1
Step 1: Click ‘Next’

installation of celcom usb modem mobile connect step 2
Step 2: Select ‘I accept the terms of the license agreement’ then click ‘Next’

installation of celcom usb modem mobile connect step 3
Step 3: Click ‘Next’

installation of celcom usb modem mobile connect step 4
Step 4: Click ‘Finish’

installation of celcom usb modem mobile connect step 5
Step 5: The Mobile Connect’s interface will appear once you finish the installation in step 4. Select ‘Settings’ and click on ‘Network Connection Settings’

installation of celcom usb modem mobile connect step 6
Step 6: Click ‘New’

installation of celcom usb modem mobile connect step 7
Step 7: Type ‘celcom’ in Profile Name column. Change ‘APN and Additional Settings’ to ‘Static’ and type ‘celcom3g’ in ‘APN:’ column

installation of celcom usb modem mobile connect step 8
Step 8: Installation and settings are done. Click ‘Connect’ then you are able to online now!

Tq http://www.horlic.com

kunkun-laptop .... ;)