Tuesday, July 12, 2011

How to increase the server time-out in Microsoft Outlook

Outlook 2000 Corporate or Workgroup mode (CW)

  1. Start Outlook.
  2. On the Tools menu, click Services.
  3. On the Services tab, select Internet E-mail, and then click Properties.
  4. Click the Advanced tab.
  5. Gradually increase the server time-out setting until the problem is resolved.

Outlook 2000 Internet Mail Only (IMO)

  1. Start Outlook.
  2. On the Tools menu, click Accounts.
  3. Select the target account, and then click Properties.
  4. Click the Advanced tab.
  5. Gradually increase the server time-out setting until the problem is resolved.

Outlook 2002 and Outlook 2003

  1. Start Outlook.
  2. On the Tools menu, click E-mail Accounts.
  3. Click View or change existing e-mail accounts, and then click Next.
  4. Click your POP3 account, and then click Change.
  5. Click More Settings.
  6. Click the Advanced tab.
  7. Gradually increase the server time-out setting until the issue is resolved.

Outlook 2007

  1. Start Outlook.
  2. On the Tools menu, click Account Settings.
  3. Click to select the target POP3 account, and then click Change.
  4. Click More Settings.
  5. Click the Advanced tab.
  6. Gradually increase the server time-out setting until the issue is resolved.

Outlook 2010

  1. Start Outlook.
  2. On the Files menu, click Info.
  3. Click Account Settings, and then select Account Settings from the list.
  4. Click to select the target POP3 account, and then click Change.
  5. Click More Settings.
  6. Click the Advanced tab.
  7. Gradually increase the server time-out setting until the issue is resolved.

Outlook Express 5.x and 6.0

  1. Start Outlook Express.
  2. On the Tools menu, click Accounts.
  3. Click the Mail tab.
  4. Click your POP3 account, and then click Properties.
  5. Click the Advanced tab.
  6. Gradually increase the server time-out setting until the problem is resolved.

Wednesday, July 6, 2011

How to Setup Android Application Development on Eclipse

Android SDK provides the tools and APIs necessary to begin developing applications on the Androidplatform using the Java programming language. Android offers a custom plugin for the Eclipse IDE, called Android Development Tools (ADT), that is designed to give you a powerful, integrated environment in which to build Android applications.

Android 2.1 on Emulator

This tutorial is intended for new developers that want to start developing Android applications using Eclipse IDE. To start develop, you have to install Java platform (JDK) first and then install the Eclipse, Android SDK and the Android Development Tool (ADT) plugin for Eclipse.

Download and Install JDK

Download and install the latest JDK (JDK 1.6 Update 18) from JDK download page

Download and Install Eclipse IDE

Download and install Eclipse Classic 3.5 (Galileo) from Eclipse download page. You can also use the Java or RCP version of Eclipse.

Download and Install Android SDK Starter Package

The Android SDK starter package includes only a single component, the latest version of the SDK Tools. Included in that component is a tool called Android SDK and AVD Manager that you can use to download other components from the SDK repository site.

  • Download the latest Android SDK starter package from the SDK download page.
  • Unpack the archive to a suitable location on your machine. By default, the SDK files are unpacked into a directory named android-sdk- . For example, on Windows platform the directory will be android-sdk-windows.
  • Android SDK

    Android SDK

Add Android Platforms to Your SDK

To add one or more Android platforms (for example, Android 1.6 or Android 2.1) to your SDK, use the Android SDK and AVD Manager, included in the SDK starter package. It is recommended to download multiple platforms, so that you can build your application on the lowest version you want to support, but test against higher versions that you intend the application to run on.

  • Launch the Android SDK and AVD Manager on Windows by executing SDK Setup.exe at the root of the SDK directory. On Mac OS X or Linux, execute the android tool in the /tools/ folder.
  • On Available Packages menu, select the platforms to download (1.1 to 2.1).
  • If you find error on HTTP SSL while fetching the repository url , try to use http instead of https by checking the Force https://… sources to be fetched using http://… option on Settings menu.
  • Click Install Selected and then select Accept All to accept selected packages.
  • Click Install Accepted button to start download and install the selected packages.

Download and Install ADT Plugin

To install the ADT Plugin, you can take advantage of the Eclipse remote update feature. By setting up a remote update site, you can easily download, install, and check for ADT updates. Alternatively, you can download the latest ADT to your development computer as a local site archive.

  • Launch Eclipse, then select Help –> Install New Software.
  • In Available Software dialog, click Add
  • Enter a name for the remote site (ex: Android Plugin) in the Name field and in the Locationfield, enter this URL:
    https://dl-ssl.google.com/android/eclipse/
    and then click OK. If you have trouble acquiring the plugin, you can try using ‘http’ instead of ’https’ in the URL.
  • Select the checkbox next to Developer Tools, which will automatically select the nested toolsAndroid DDMS and Android Development Tools and then click Next.
  • On the next dialog, click Next to read and accept the license agreement and install any dependencies, then click Finish.
  • Restart Eclipse
  • To check whether the ADT has been installed correctly, try to create a new project by selectFile > New > Project., you shoud find Android Project listed on project wizard.

Friday, June 24, 2011

How to Reboot or Reset BlackBerry Torch 9800

“How do I reboot or reset my BlackBerry?” is one of the first questions that new BlackBerry owners ask me. This tutorial documents how to do both the soft and hard resets.

If your Torch locks up, the first thing always to do is to reboot or reset the phone.

Soft Reset / Reboot:

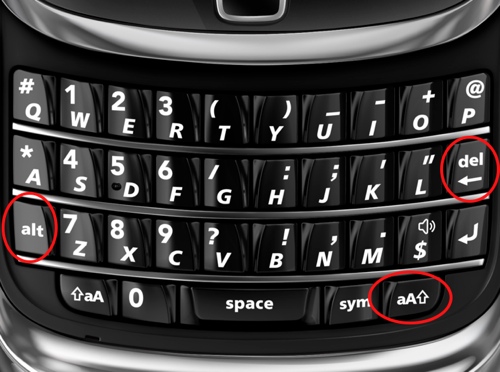
Press and Hold the alt key, right shift/caps lock key, and del key. Pay attention that it is the shift key on the right. Hold the key combo until the LED light turns red and the screen locks. The reboot process will begin.

hold alt, right shift, del to soft reset the Torch

Hard Reset / Reboot:

If the phone is locked so hard that the soft reset does not work, a hard reset is your only option. Open the phone back and remove the battery. Wait a few seconds for the phone to completely go dark and reinsert the battery.

Tq http://www.tech-recipes.com

Monday, February 14, 2011

How to make .NET desktop software that expire

There are a number of technical solutions that range in complexity and how easy they are to circumvent.
  • Write the date/time first used to a file. The user simply needs to find the file and update it themselves with a newer date. You could improve the security by encrypting the date/time before writing it.
  • Write the date/time to the registry. Slightly more secure - but only via obscurity. Again perhaps use encryption to hide the actual data.
  • Write the date/time to two (or more) places.
  • Store the date/time on your server. This does require that the user has to be on-line to use your application.
  • To prevent unauthorised copying you could require that the user enter a license key when they install the software. This would be stored in the registry. You then get into the problem of what to do if someone distributes their key. A call back to your central database would help here, but you'd need to store your users IP address (for example), though this would fail if they didn't have a static IP or there were multiple users behind a corporate firewall.

kunkun-laptop .... ;)