Friday, January 30, 2009

Install Webmin in Ubuntu

Webmin is a web-based interface for system administration for Unix. Using any modern web browser, you can setup user accounts, Apache, DNS, file sharing and much more. Webmin removes the need to manually edit Unix configuration files like /etc/passwd, and lets you manage a system from the console or remotely. Currently There is no Webmin package in the Ubuntu repositories. This tutorial will explain how to Install Webmin in Ubuntu Intrepid Ibex

You can install webmin for your server web interface to configure apache2,mysql,FTp servers and many more. Now we will see how to install webmin in Ubuntu 8.10

Preparing your system

First you need to install the following packages

Quote : aptitude install perl libnet-ssleay-perl openssl libauthen-pam-perl libpam-runtime libio-pty-perl libmd5-perl

Now download the latest webmin using the following command or from here

Quote : wget http://garr.dl.sourceforge.net/sourceforge/webadmin/webmin_1.441_all.deb

Now we have webmin_1.441_all.deb package install this package using the following command

Quote : dpkg -i webmin_1.441_all.deb

This will complete the installation.

Ubuntu in particular don’t allow logins by the root user by default. However, the user created at system installation time can use sudo to switch to root. Webmin will allow any user who has this sudo capability to login with full root privileges.

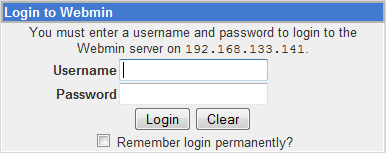
Now you need to open your web browser and enter the following

https://your-server-ip:10000/

Now you should see similar to the following Screen

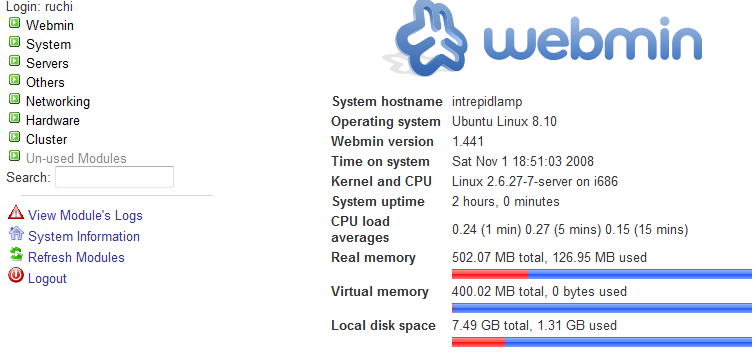
After login if you want to configure Apache,Mysql server you need to click on Servers on your lefthand side you should many servers are ready to configure

This is very Easy to configure most of the servers and Enjoy your new Ubuntu Intrepid Ibex LAMP Server.

Enjoy ubuntu... ;)

Tq http://www.ubuntugeek.com/

Thursday, January 29, 2009

Command to combine the three files / folder into a single .tar.gz archive

Quote : tar cvfz kunkun.tar.gz kunkunX Mackunkun Xkunkun/

Enjoy ubuntu... ;)

Avast Antivirus for Ubuntu

avast! Home Edition is a complete anti-virus package, that is is free for registered home non-commercial users. It contains an on-demand scanner with two interfaces (simple for novices and advanced for experienced users), an on-access scanner with Standard Shield (which protects against execution and opening malware programs) and an embedded e-mail scanner which scans incoming and outgoing email messages.


Install Avast Antivirus in Ubuntu

First you need to download the .deb package from here

Quote : dpkg -i avast4workstation_1.0.6-2_i386.deb

This will complete the installation now you need to get the registration key for this you need to fill the on-line form available here and they will send registration key to your mail address

Applications Menu Setup

Quote : cd /usr/lib/avast4workstation/share/avast/desktop

Quote : ./install-desktop-entries.sh install

This will complete the application menu setup.

If you want to access you need to go to Applications—>Accessories—>avast!Antivirus

First time it will prompt for license key enter your license key you have got

Enjoy ubuntu... ;)

Wednesday, January 28, 2009

Open Source PHP Content Management

These Open Source PHP Content Management System(CMS) listed here are good and commonly used by many Web Publishers. A CMS enabled website has many benefits:
  • People with average knowledge of word processing can create the content directly.
  • Little or no HTML knowledge needed.
  • Content is managed through a cycle of capture, storage, retrieval publication, presentation, versioning, and archiving.
  • Users are assigned roles and permissions that prevent them from editing content which they have no rights.
  • Publishing of content can be time-controlled, hidden for later use or require user login with password.
The following are commonly used Open Source PHP Content Management System(CMS)
  1. Drupal - An advanced portal with collaborative book, search engines friendly URLs, online help, roles, full content search, site watching, threaded comments, version control, blogging, news aggregator.
  2. Joomla! - Joomla! is one of the most powerful Open Source Content Management Systems on the planet. It is used all over the world for everything from simple websites to complex corporate applications. Joomla! is easy to install, simple to manage, and reliable. For great Joomla! Templates, check out TemplatePlazza.com
  3. Mambo - A professional level yet easy to use Content Management System featuring inline WYSIWYG content editors, newsfeeds, syndicated news, banners, mailing users, links manager, statistics, content archiving, date based content, 20 languages, modules and components.
  4. PHPNuke - One of the most popular community-based portals with a big choice of modules and languages. PHP-Nuke is a news automated system specially designed to be used in Intranets and Internet. The Administrator has total control of his web site, registered users, and he will have in the hand a powerful assembly of tools to maintain an active and 100% interactive web site using databases.
  5. PostNuke - A Content Management System with focus on flexibility and security. A big variety of modules and blocks makes this CMS an all round tool.
  6. XOOPS - A Xoops is an extensible. OO(Object Oriented), easy to use dynamic web content management system written in PHP. XOOPS is the ideal tool for developing small, to large dynamic community websites, intra company portals, weblogs and etc.
Enjoy ubuntu... ;)

Monday, January 26, 2009

Convert em,px,pt and % in css

Chart that converts points to pixels (and ems and %). It’s an approximation, which will depend on font, browser and OS, but it’s a good starting point.

Points Pixels Ems Percent
6pt 8px 0.5em 50%
7pt 9px 0.55em 55%
7.5pt 10px 0.625em 62.5%
8pt 11px 0.7em 70%
9pt 12px 0.75em 75%
10pt 13px 0.8em 80%
10.5pt 14px 0.875em 87.5%
11pt 15px 0.95em 95%
12pt 16px 1em 100%
13pt 17px 1.05em 105%
13.5pt 18px 1.125em 112.5%
14pt 19px 1.2em 120%
14.5pt 20px 1.25em 125%
15pt 21px 1.3em 130%
16pt 22px 1.4em 140%
17pt 23px 1.45em 145%
18pt 24px 1.5em 150%
20pt 26px 1.6em 160%
22pt 29px 1.8em 180%
24pt 32px 2em 200%
26pt 35px 2.2em 220%
27pt 36px 2.25em 225%
28pt 37px 2.3em 230%
29pt 38px 2.35em 235%
30pt 40px 2.45em 245%
32pt 42px 2.55em 255%
34pt 45px 2.75em 275%
36pt 48px 3em 300%

Enjoy ubuntu... ;)

Saturday, January 10, 2009

RCPFA is a patchet of PHP files which patch the RoundCube software to interoperate with PostfixAdmin.

RCPFA is a patchet of PHP files which patch the RoundCube software to interoperate with PostfixAdmin.

1. Download here

2. Installation notes:

First, you should make sure that you already have db.inc.php and main.inc.php config files in your config subdir of RoundCube root directory. If you don’t have them, you can just copy the default files which come with RoundCube (they have .dist extension).

Then you should uncompress this package into a Roundcube root directory. After uncompression, new directory “rcpfa-x.x.x” should appear. Then you should do something like:


$ cd rcpfa-x.x.x
$ sh INSTALL.TXT

If you prefer, you can also execute the steps in INSTALL.TXT by hand.

After you have patched the RoundCube, have a look at it’s configuration files main.inc.php and db.inc.php - in the end of both you should find additional sections for PostfixAdmin configuration.

Enjoy ubuntu... :)

Tq http://nejc.skoberne.net/projects/rcpfa/

Thursday, January 8, 2009

Install Avant Window Navigator (AWN) in ubuntu

AWN - short for Avant Window Navigator is a dock like bar which sits at the bottom of the screen. It provides similar effects as the Dock in Mac OSX Leopard. The AWN project consists of three main parts namely

1. The Dock
2. AWN window navigator and
3. The shared library 'libawn' which is used to develop applets which enhance the functionality of AWN. The applets can be coded in either 'C' or 'Python' language.

Pre-requisites for installing AWN
To install AWN on your Linux machine, it has to meet certain conditions. Them being -

i - Xgl or AIGLX installed - in short your computer should be capable of compositing support. This mostly means if you have an Nvidia or ATI video card, you should download and install the proprietary drivers.
ii - A compositing manager installed. A few examples of compositing managers are Beryl/Compiz/Compiz Fusion, Cairo, Xfce, Metacity, xcompmgr and so on.
In Ubuntu you can enable compositing manager by clicking System>Preferences> Appearance and then enabling Visual effects from the 'Visual Effects' tab in the Appearance dialog.

Installation
1. In Ubuntu Gutsy Gibbon, the installation of AWN is a two step process. First you have to enable the backports repository which contain the necessary binaries of avant window navigator and related files.

This is done by clicking System>Administration>Software sources on the GNOME panel.

It opens the "Software sources" dialog box.

In that click the 'Updates' tab and enable the gutsy-backports option.

Enable gutsy-backports in the Updates tab.

Then,
Quote : sudo apt-get update
Quote : sudo apt-get install avant-window-navigator awn-manager

awn-manager is a GUI tool which allows you to make changes to the look and feel of the AWN dock as well as install and manage applets and themes.

Now that you have installed Avant Window Manager, it is time to take it for a test drive. To start AWN, click GNOME menu <Applications>Accessories>Avant Window Navigator.

Enjoy ubuntu... :)

Tq linuxhelp.blogspot.com

Tuesday, January 6, 2009

How to update Fonts on ubuntu

1. Install Liberation Fonts
Quote : sudo echo "deb http://ppa.launchpad.net/corenominal/ubuntu gutsy main" | sudo tee -a /etc/apt/sources.list and
Quote : sudo echo "deb-src http://ppa.launchpad.net/corenominal/ubuntu gutsy main" | sudo tee -a /etc/apt/sources.list and
Quote : sudo apt-get update and
Quote : sudo apt-get install ttf-liberation

2. Install Microsoft Fonts
Quote : sudo apt-get install msttcorefonts and
Quote : sudo fc-cache

3. Install A couple of Handwriting fonts
Quote : sudo apt-get install ttf-sjfonts

Enjoy ubuntu... ;)

Photorec for data forensik on ubuntu

1. Install : testdisk

2. Mount your hardisk, pendrive, memory card etc

3. Quote : sudo photorec

4. Choose your drive, then ENTER

5. Select partition table, then ENTER.

6. Select partition, then ENTER.

7. Select file system, then ENTER.

8. Select unalocated space only [FREE], then ENTER.

9. Select folder to save the recovery data, then enter Y.

10. Done.

Enjoy ubuntu... ;)

Crack Password Package .rar on Ubuntu

1. Download rarcrack
Quote : wget http://superb-east.dl.sourceforge.net/sourceforge/rarcrack/rarcrack-0.2.tar.bz2

2. Extract racrack
Quote : tar xvjf rarcrack-0.2.tar.bz2

3. Call folder rarcrack
Quote : cd rarcrack-0.2

4. Install dependencies for support rarcrack
Quote : sudo apt-get install libxml2-dev

5. Install rarcrack
Quote : sudo make
Quote : sudo make install

6. For crack the password
Quote : rarcrack /home/kunkun/kunkun.rar

Enjoy ubuntu.. :)

Tq melayubuntu.blogspot.com

First time login as SU on ubuntu

1. Quote : sudo passwd

GPRS/EDGE connection DiGi in Ubuntu with wvdial using Nokia 3310c

Setting up your computer with wvdial with bluetooth-connected phone Nokia 3310c, in this case with DiGi provider in Malaysia.

First of all, make sure your phone is paired with your laptop.


1. Quote : sudo vi /etc/bluetooth/pin:

1234

2. Plugin The bluetooth dongle and activate the bluetooth on your mobile
Issue this command

Quote: hcitool scan
It will give you an output like this
Quote:
Scanning ...
00:1B:33:D5:22:E4 Nokia 3310c
Note/Copy the address "00:1B:33:D5:22:E4".

3. Quote : sudo vi /etc/bluetooth/rfcomm.conf:


# RFCOMM configuration file.
#
rfcomm0 {
# Automatically bind the device at startup
bind yes;
# Bluetooth address of the device
device 00:1B:33:D5:22:E4; #paste here
#
# RFCOMM channel for the connection
channel 1;
#
# Description of the connection
comment "DIGI";
}

4. Quote : sudo vi /etc/wvdial.conf:

[3310c]
Modem = /dev/rfcomm0
Baud = 460800
SetVolume = 0
Dial Command = ATDT
Init1 = ATH
Init2 = ATM0
Init3 = AT+CGDCONT=1,"IP","diginet","",0,0
FlowControl = None

[Dialer DIGI]
Username = digi
Password = 1234
Phone = *99#
Stupid Mode = 1
Inherits = 3310c

5. You can connect by:

Quote : sudo wvdial DIGI

6. Ctrl+C to disconnect.

Enjoy ubuntu... ;)

Friday, January 2, 2009

Configure GPRS/EDGE via Bluetooth ( NOKIA 3310 CLASSIC ) for DIGI

How to configure internet access through GPRS/EDGE, using bluetooth connection with your GSM phone.

I am using ubuntu and Nokia 3310c phone with DIGI Connection, but this will work with any distribution and any bluetooth capable phone..

* Requirements:

1) GPRS/EDGE Enabled Phone (Here Nokia 3310c)
2) GPRS Connection (Here DIGI, MALAYSIA)
3) BlueTooth Dongle
4) bluez-utils
Quote:
sudo apt-get install bluez-utils
5) ppp
Quote: sudo apt-get install ppp

6) latest 2.6 kernel

* Now the simple easy steps:

Step 1.
Plugin The bluetooth dongle and activate the bluetooth on your mobile
Step 2.
Issue this command
Quote: hcitool scan
It will give you an output like this
Quote:
Scanning ...
00:1B:33:D5:22:E4 Nokia 3310c
Note/Copy the address "00:1B:33:D5:22:E4" somewhere.
This is the bluetooth address of the phone.

Step 3.
Issue this command
Quote: sudo vi /etc/bluetooth/pin-helper
Put this on that file and save
Quote:
#!/bin/sh
echo -n "PIN:" cat /etc/bluetooth/pin
also remember to check the file "/etc/bluetooth/pin"
which should have something like this "1234", If it is not there create that files and put "1234"

Step 4.
Issue this
Quote:sudo vi /etc/bluetooth/rfcomm.conf
Put this
Quote:
rfcomm0 {
bind yes;
device 00:1B:33:D5:22:E4;
channel 1;
comment "Nokia 3310c";
}
Remember to replace this "00:1B:33:D5:22:E4" with the address you copied in step 2.

Step 5.

Create a file
Quote: sudo vi /etc/ppp/peers/digi
Put this
Quote:
/dev/rfcomm0 115200
connect '/usr/sbin/chat -v -f /etc/ppp/chat-gprs'
crtscts
modem -detach
noccp
defaultroute
usepeerdns
noauth
ipcp-accept-remote
ipcp-accept-local
noipdefault

Step 6.
Create a file
Quote: sudo vi /etc/ppp/chat-gprs
Put this
Quote:
'' ATZ OK
AT+CGDCONT=1,"IP","diginet"
OK "ATD*99#"
CONNECT ''
You need to ask your service provider and replace the "diginet"
and "*99#", these are the IP/host name of gprs provider and dialup no.

Step 7.
Quote: pppd call digi

Enjoy Ubuntu.

kunkun-laptop .... ;)