Showing posts with label dhcp. Show all posts

Sunday, October 24, 2010

DHCP server - Windows

The installation of the DHCP-server on Windows NT4 server (the DHCP-server
is NOT included in Windows NT4 workstation )
is very simple:

In the Network-configuration,
tab: Services, click on "Add"
and then select:
"Microsoft DHCP Server"

The following notice will be displayed:

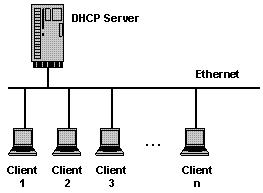
The system running the DHCP-server (distributing IP-addresses to other systems)
itself MUST use a static IP-address (manually assigned) , it can NOT request
to receive an IP-address from any DHCP-server (itself or another DHCP server).

Like after all changes to the network configuration, you have to reboot:


Configuration of the DHCP-server

Although the DHCP-server is listed
as a Networking service, it is NOT
configured from the Network applet
(the Properties button is grayed out)
The "DHCP - Manager" has been
added to the menu for the
"Administrative Tools"
You need to define now a range of IP-addresses
to be distributed.
This range is called: "Scope".

To be able to define Scope, click first on the
entry "Local Machine" to expand the entry,
the "+" -sign needs to change to the "-"-sign.
Only then you are able to select from the
menu: "Scope" the option "Create"


You assign the range of IP-addresses to be assigned by DHCP-server
( in the example: all IP-addresses between 102.54.107.1 and 192.54.107.49):

usually, an IP-address is NOT assigned permanently, but only for a limited
time, called the "Lease Duration".

On selected the "OK"-button, you will be asked on whether to activate
the scope, select "Yes":


The yellow light-bulb indicates, that
the scope is now active and that the
DHCP-server is ready to assign the
IP-addresses.
To display the IP-range ("Scope") for
viewing/editing, select from the menu
"Scope" the option "Properties"

Setting up a connected Windows systems to use the DHCP-server is very simple:

In the Network-configuration,
select the properties for the
TCP/IP-protocol and just make
sure, that it defines to
"obtain an IP address automatically"


To verify the assigned IP-address on a Windows95/98 system, run the
"WINIPCFG" program (usually from the RUN-menu)(On Windows NT, use IPCONFIG):

In this example, DHCP assigned the IP-address 192.54.107.1.
But there is no "Default gateway" defined !


TCP/IP requires more than just the IP-address, for communication outside
the local network-cable (the local "subnet"), it needs to know the IP-address
of the Gateway (also called Router).
DHCP can be configured to provide also this information to the clients:

make sure, that your Scope is selected
(highlighted in blue), then select from the
menu: "DHCP Options", then "Scope"


From the list of
"Unused Options", select
"Router", then use the
"Add"-button.
Once the "Router" is
an "Active Option",
click on the button
"Value" to define the
IP-address for the Router.
On the expanded Windows,
click on "Edit Array",
allowing then to enter
the IP-address of the
Router, then select the
"Add"-button to get the
new values displayed in
the list of IP-addresses.

Press "OK" to exit this
window.
The IP-address of the
Router is displayed.

Press "OK" to close the
DHCP-Options window.


The DHCP-Mananger is now displayed
for the scope also the option for the
Router.

When now checking on Windows95/98 with WINIPCFG:

the IP-address for the "Default Gateway" is defined.

If your configuration requires the use of WINS, it can be also configured
as an option of the DHCP-server.


DHCP can also be used to assigned IP-addresses for incoming RAS-
connections
:


To view the list of IP-address already
assigned, select from the menu: "Scope"
the option "Active Leases"
In this example, 192.54.107.1 is assign
to a LAN user, while 192.54.107.2
is assigned to the Modem to handle
incoming RAS TCP/IP-connections.

Howto: Ubuntu Linux convert DHCP network configuration to static IP configuration

Your main network configuration file is /etc/network/interfaces

Desired new sample settings:
=> Host IP address 192.168.1.100
=> Netmask: 255.255.255.0
=> Network ID: 192.168.1.0
=> Broadcast IP: 192.168.1.255
=> Gateway/Router IP: 192.168.1.254
=> DNS Server: 192.168.1.254

Open network configuration file
$ sudo vi /etc/network/interfacesOR$ sudo nano /etc/network/interfaces

Find and remove dhcp entry:
iface eth0 inet dhcp

Append new network settings:

iface eth0 inet static
address 192.168.1.100
netmask 255.255.255.0
network 192.168.1.0
broadcast 192.168.1.255
gateway 192.168.1.254

Save and close the file. Restart the network:
$ sudo /etc/init.d/networking restart

Task: Define new DNS servers

Open /etc/resolv.conf file
$ sudo vi /etc/resolv.conf

You need to remove old DNS server assigned by DHCP server:
search myisp.com
nameserver 192.168.1.254
nameserver 202.54.1.20
nameserver 202.54.1.30

Save and close the file.

Task: Test DNS server

$ host cyberciti.biz

Network command line cheat sheet

You can also use commands to change settings. Please note that these settings are temporary and not the permanent. Use above method to make network changes permanent or GUI tool as described below.

Task: Display network interface information

$ ifconfig

Task: Take down network interface eth0 / take a network interface down

$ sudo ifconfig eth0 downOR $ sudo ifdown eth0

Task: Bring a network interface eth0 up

$ sudo ifconfig eth0 upOR$ sudo ifup eth0

Task: Change IP address and netmask from command line

Activate network interface eth0 with a new IP (192.168.1.50) / netmask:
$ sudo ifconfig eth0 192.168.1.50 netmask 255.255.255.0 up

Task: Display the routing table

$ /sbin/route OR$ /sbin/route -n
Output:

Kernel IP routing table
Destination Gateway Genmask Flags Metric Ref Use Iface
localnet * 255.255.255.0 U 0 0 0 ra0
172.16.114.0 * 255.255.255.0 U 0 0 0 eth0
172.16.236.0 * 255.255.255.0 U 0 0 0 eth1
default 192.168.1.254 0.0.0.0 UG 0 0 0 ra0

Task: Add a new gateway

$ sudo route add default gw 172.16.236.0

Task: Display current active Internet connections (servers and established connection)

$ netstat -nat

Task: Display open ports

$ sudo netstat -tulpOR$ sudo netstat -tulpn

Task: Display network interfaces stats (RX/TX etc)

$ netstat -i

Task: Display output for active/established connections only

$ netstat -e
$ netstat -te
$ netstat -tue

Where,

  • -t : TCP connections
  • -u : UDP connections
  • -e : Established

Task: Test network connectivity

Send ICMP ECHO_REQUEST to network hosts, routers, servers etc with ping command. This verifies connectivity exists between local host and remote network system:
$ ping router
$ ping 192.168.1.254
$ ping cyberciti.biz

See simple Linux system monitoring with ping command and scripts for more information.

Task: Use GUI (Graphical Configuration) network Tool

If you are new, use GUI configuration tool, type the following command at terminal:
$ network-admin &

Above command is Ubuntu's GUI for configuring network connections tool.

Final tip - Learn how find out more information about commands

A man page is your best friend when you wanted to learn more about particular command or syntax. For example, read detailed information about ifconfig and netstat command:
$ man ifconfig
$ man netstat

Just get a short help with all command options by appending --help option to each command:
$ netstat --help

Find out what command is used for particular task by searching the short descriptions and manual page names for the keyword:
$ man -k 'delete directory'
$ apropos -s 1 remove

Display short descriptions of a command:
$ whatis rm
$ whatis netstat

Linux offers an excellent collection of utilities, which can be use to finding the files and executables, remember you cannot memorize all the commands and files ;)

How do I find out my DHCP server address?

Q. In Windows XP / 2000 / Vista ipconfig /all command will show me DNS server and DHCP server ip address. But, how to know DHCP server address in Linux?

A. The DHCP protocol allows a host to contact a central server which maintains a list of IP addresses which may be assigned on one or more subnets. A DHCP client may request an address from this pool, and then use it on a temporary basis for communication on network.

dhclient.leases file

Under Linux you use command dhclient to obtain and managing dhcp tasks. In order to keep track of leases across system reboots and server restarts, dhclient keeps a list of leases it has been assigned in the dhclient.leases file. On startup, after reading the dhclient.conf file, dhclient reads the dhclient.leases file to refresh its memory about what leases it has been assigned.

When a new lease is acquired, it is appended to the end of the dhclient.leases file. In order to prevent the file from becoming arbitrarily large, from time to time dhclient creates a new dhclient.leases file from its in-core lease database. The old version of the dhclient.leases file is retained under the name dhclient.leases~ until the next time dhclient rewrites the database.

Find out DHCP server address

Usually dhclient.leases file is located at /var/lib/dhcp3/dhclient.leases, type the following command:
less /var/lib/dhcp3/dhclient.leases
OR
cat /var/lib/dhcp3/dhclient.leases
Alternatively, you can just use grep command to get DHCP server address, enter:
grep dhcp-server-identifier /var/lib/dhcp3/dhclient.leases
Output:

lease {  
interface "ra0";
fixed-address 192.168.1.106;
option subnet-mask 255.255.255.0;
option dhcp-lease-time 86400;
option routers 192.168.1.1;
option dhcp-message-type 5;
option dhcp-server-identifier 192.168.1.1;
option domain-name-servers 208.67.222.222,208.67.220.220;
option dhcp-renewal-time 43200;
option dhcp-rebinding-time 75600;
option host-name "vivek-desktop";
renew 0 2007/12/9 05:17:36;
rebind 0 2007/12/9 15:06:37;
expire 0 2007/12/9 18:06:37;
}

lease {
interface "ra0";
fixed-address 192.168.1.106;
option subnet-mask 255.255.255.0;
option routers 192.168.1.1;
option dhcp-lease-time 86400;
option dhcp-message-type 5;
option domain-name-servers 208.67.222.222,208.67.220.220;
option dhcp-server-identifier 192.168.1.1;
option dhcp-renewal-time 43200;
option dhcp-rebinding-time 75600;
option host-name "vivek-desktop";
renew 0 2007/12/9 06:11:22;
rebind 0 2007/12/9 16:13:50;
expire 0 2007/12/9 19:13:50;
}

A note about RHEL / CentOS / Fedora Linux user

Redhat and friends uses /var/lib/dhcp/dhclient.leases file:
less /var/lib/dhcp/dhclient.leases

Tuesday, October 5, 2010

How to Install and Configure DHCP Server in Ubuntu Server

A DHCP Server assigns IP addresses to client computers. This is very often used in enterprise networks to reduce configuration efforts. All IP addresses of all computers are stored in a database that resides on a server machine.

A DHCP server can provide configuration settings using two methods

Address Pool

This method entails defining a pool (sometimes also called a range or scope) of IP addresses from which DHCP clients are supplied their configuration properties dynamically and on a fist come first serve basis. When a DHCP client is no longer on the network for a specified period, the configuration is expired and released back to the address pool for use by other DHCP Clients.

MAC Address

This method entails using DHCP to identify the unique hardware address of each network card connected to the network and then continually supplying a constant configuration each time the DHCP client makes a request to the DHCP server using that network device.

Install DHCP server in ubuntu

sudo apt-get install dhcp3-server

This will complete the installation.

Configuring DHCP server

If you have two network cards in your ubuntu server you need to select which interface you want to use for DHCP server listening.By default it listens to eth0.

You can change this by editing /etc/default/dhcp3-server file

sudo vi /etc/default/dhcp3-server

Find this line

INTERFACES=”eth0″

Replace with the following line

INTERFACES=”eth1″

Save and exit.This is optional.

Next you need to make a backup copy of /etc/dhcp3/dhcpd.conf file

cp /etc/dhcp3/dhcpd.conf /etc/dhcp3/dhcpd.conf.back

Edit /etc/dhcp3/dhcpd.conf file using the following command

sudo vi /etc/dhcp3/dhcpd.conf

Using address pool method

You need to change the following sections in /etc/dhcp3/dhcpd.conf file

default-lease-time 600;
max-lease-time 7200;

option subnet-mask 255.255.255.0;
option broadcast-address 192.168.1.255;
option routers 192.168.1.254;
option domain-name-servers 192.168.1.1, 192.168.1.2;
option domain-name “yourdomainname.com”;

subnet 192.168.1.0 netmask 255.255.255.0 {
range 192.168.1.10 192.168.1.200;
}

save and exit the file

This will result in the DHCP server giving a client an IP address from the range 192.168.1.10-192.168.1.200 . It will lease an IP address for 600 seconds if the client doesn’t ask for a specific time frame. Otherwise the maximum (allowed) lease will be 7200 seconds. The server will also “advise” the client that it should use 255.255.255.0 as its subnet mask, 192.168.1.255 as its broadcast address, 192.168.1.254 as the router/gateway and 192.168.1.1 and 192.168.1.2 as its DNS servers.

Using MAC address method

This method is you can reserver some of the machines or all the machines with fixed ip address.In the following example i am using fixed ip address for server1,server2,printer1 and printer2

default-lease-time 600;
max-lease-time 7200;

option subnet-mask 255.255.255.0;
option broadcast-address 192.168.1.255;
option routers 192.168.1.254;
option domain-name-servers 192.168.1.1, 192.168.1.2;
option domain-name “yourdomainname.com”;

subnet 192.168.1.0 netmask 255.255.255.0 {
range 192.168.1.10 192.168.1.200;
}

host server1 {
hardware ethernet 00:1b:63:ef:db:54;
fixed-address 192.168.1.20;
}

host server2 {
hardware ethernet 00:0a:95:b4:d4:b0;
fixed-address 192.168.1.21;
}

host printer1 {
hardware ethernet 00:16:cb:aa:2a:cd;
fixed-address 192.168.1.22;
}

host printer2 {
hardware ethernet 00:0a:95:f5:8f:b3;
fixed-address 192.168.1.23;
}

Now you need to restart dhcp server using the following command

sudo /etc/init.d/dhcp3-server restart

Configure Ubuntu DHCP Client

If you want to configure your ubuntu desktop as DHCP client following this procedure

You need to open /etc/network/interfaces file

sudo vi /etc/network/interfaces

make sure you have the following lines (eth0 is an example)

auto lo eth0
iface eth0 inet dhcp
iface lo inet loopback

Save and exit the file

You need to restart networking services using the following command

sudo /etc/init.d/networking restart

How to find DHCP server IP address

You need to use the following commands

sudo dhclient

or

tail -n 15 /var/lib/dhcp3/dhclient.*.leases

Enjoy ubuntu... ;)

kunkun-laptop .... ;)