Saturday, January 30, 2010

How to install LAMP on ubuntu

Start install Apache:
1. Open the terminal (we will be using it through most of my guide) from Applications > Accessories > Terminal

2. Install apache2 using apt-get by typing the following

Quote : sudo apt-get install apache2

Note that you should know the root password.
Now everything should be downloaded and installed automatically.

To start/stop apache2 write:

Quote : sudo /etc/init.d/apache2 start
Quote : sudo /etc/init.d/apache2 stop

Your www folder should be in: /var/www/

Then install PHP / PHP5:
1. Also in terminal write:

Quote : sudo apt-get install php5 libapache2-mod-php5

Then install MySQL:
1. In terminal execute :

Quote : sudo apt-get install mysql-server

2. (optional) If you are running a server you should probably bind your address by editing bind-address in /etc/mysql/my.cnf and replacing its value (127.0.0.1) by your IP address

3. set your root password (although mysql should ask you about that when installing)

mysql> SET PASSWORD FOR ‘root’@'localhost’ = PASSWORD(‘xxxxxx’);

4. Try running it

mysql -u root -p xxx

where xxx is your password.
Note: You can install PHPMyAdmin for a graphical user interface of MySQL by executing

Qoute : sudo apt-get install libapache2-mod-auth-mysql php5-mysql phpmyadmin


Enjoy ubuntu... ;)

Thursday, January 7, 2010

How to include any module in Joomla 1.5

Let's take one example, our Google AdSense module. This can be placed in any module position of the template by default, but not within content. This tutorial shall now explain how to enable it (or any other module) within content in Joomla! 1.5.

STEP 1: Create a new copy of the Module just for in-content use.

Create a copy of the Joomla module

Extensions > Module Manager. Check the checkbox before the module in question and click on "Copy" on the top right (see image).

The copy is placed just under the original in the same module position and is unpublished by default. It will be named "Copy of ...".

STEP 2: Open the Module that you just copied.
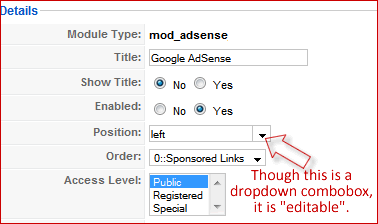
Edit the POSITION of the Joomla moduleNow just click on the name of the module (Copy of ...).

STEP 3: Change the "Module Position"

Here, we are going to do something very sleek. With the module opened, look at the left side of the screen. You will see a parameter named "Position". It will have a dropdown combobox in front of it. Joomla! developers have hidden a truly powerful option here. It is "editable". See picture on the right to get a clear idea. So what? Read on...

Let's edit the position name and "create" a new unique position just for in-content use, which will not be shown on the template elsewhere. Do not click on the arrow, but click directly within the textbox of that field and "delete" the content (using delete or backspace key). Now type a new name, let's say content_adsense125 (You can type any name you want, but this to me means that I am using this for showing AdSense ads, 125x125 size for in-content use).

Look at the next picture below for what it will look like. After making the other necessary changes to the module parameters on the right side, "Save" the module. This will now be saved in the "new" position that you just created.As it is a custom position, it will not show on the frontend. That was our purpose too, we want it to show only within content and only where we assign. See the right side ads for an example.
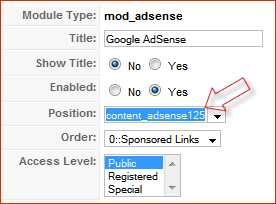
Edit the POSITION of the Joomla module

STEP 4: Go to the Plugin Manager

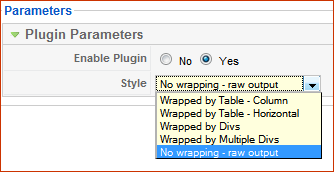
Change the Load Module Plugin ParameterExtensions > Plugin Manager. Look for a plugin named "Content - Load Module". Open it. On the right side, you will see a dropdown box. Click on its arrow and select "No wrapping - raw output" as shown in the next picture.

STEP 5. STEP 6, STEP 7...

Open your content item within which you want to show the module. In the desired location within the article, just type

LOAD the module now

where"loadposition" is a constant to call the plugin that we just edited in step 4 and "module" is the variable module position to be called, in this case we should change it to content_adsense125 as done in step 3. As indicated above, change only the blue text and leave the red untouched.

Just one word of caution, do not use standard positions like "left" or "user1" inside content. They may load ALL the modules in that position into that content.

From now on, you should be able to place any module in any content of your choice.


Tq http://www.joomlaspan.com

Enjoy ubuntu... ;)

Friday, January 1, 2010

How to solve your Sony Ericsson W810i Blinking white

XS++ Key Functions

Flashing - XS++ is able to fully flash firmware to DB2000, DB2010, DB2020 and PNX5320 platforms. This requires one "Main" and one "FS" file.

Customizing - In order to fully complete a flash, or after flashing an "FS" file your phone MUST be "customized/Finalized". If you skip this step, you WILL recieve the error when turning on your phone: "Configuration error. Please contact your network operator or service centre."

FS Modifications - You may "hack" your phones File System by using "FSX". FSX will mapp your phones complete filesystem and then enumerate the files in each directory. You may, upload files, delete files, delete folders, create folders and browse the FS.
After any modifications are made, you MUST "Shutdown" the FS in order to save your changes.

XS++ Application Work Area

New window
Click to expand / contract


  • A1 - The log window. Outputs XS++ messages while connected to your phone.
  • A2 - Top status bar. Displays your phone CID, Baseband and name while connected.
  • A3 - Tab selection. Here you may switch between XS++ functions.
  • A4 - Bottom status bar. Displays dynamic information about what XS++ is currently doing.
  • A5 - Progress bar. Gives the user some idea of a functions progress.


Flashing Firmware With XS++

Step 1. - Find the firmware files you need. The are are many "free" resources at http://www.se-nse.com which contain firmware as well as http://www.iprotebe.cz .

Step 2. - Select the firmwares (make sure you extract them first) by clicking the "..." buttons or simply dragging the file from the explorer to the box. You may flash Main, FS and Customize all in one go. Alternatively you may perform any single or multiple combination of the three.

- XS++ supports BABE files. If the file you are attempting to flash is not compatible, XS++ will reject the file and disconnect.
Click "Flash" and wait (this takes a while, 6-7 minutes is normal).

New window
Click to expand / contract


New window
Click to expand / contract


New window
Click to expand / contract


Step 3. - Flashing is done, you can breathe now. Disconnect and turn ON your handset.

Customizing/Finalizing With XS++

Step 1. - Take battery out of phone and put back in (do not turn phone on). Open XS++ and click Connect. Hold down the "C" button on the phones keypad and connect the USB cable.

Step 2. - Tick “Customize File System”, select model and region/CDA, click flash. If you cannot find a custpack in XS++ that meets your needs you may upload your own. Select "own custpack" from the CDA menu. The make a folder in the same directory as XS++.exe called "own_custpack". Inside, extract the pack you want to use, keeping the tpa/preset/custom folder tree.

New window
Click to expand / contract


New window
Click to expand / contract


New window
Click to expand / contract


Step 3. - Done. Disconnect and turn ON your handset.

- If XS++ does not contiain the cust pack your require. You may download one, select "own_custpack" from the CDA box, create the folder "own_custpack" in the same directory as XS++ and then extract the custpack to it, keeping the tpa/preset/custom tree.

Tq http://www.esato.com/

Enjoy ubuntu... ;)

How to setup MMS (CELCOM) for Sony Ericsson W810

Step1:

Main Menu > Settings

  • Press your joystick to the left until your main title is Connectivity
  • Select Data comm
  • Select Data Accounts > New Account > press Add
  • Select GPRS data
  • Name : Celcom MMS
  • Press Continue
  • Choose APN: > press Edit
  • APN : mms.celcom.net.my ( for postpaid ), celcom ( for prepaid ), celcom3g ( 3G SIMcard )
  • Press Save
  • Press Back (2X)
  • Select Internet settings
  • Select Internet profiles > choose New profile > press Add
  • Name : Celcom MMS
  • Select Connect using: > Select Celcom MMS
  • Press Save
  • Go to celcom MMS > press More > select Settings
  • Connect using : Celcom MMS
  • Internet mode : HTTP
  • Use proxy : YES
  • Proxy address : 010.128.001.242
  • Port number : 8080
  • Press Save
  • Press More > Select Advanced
  • Select Change homepage
  • Name : Celcom MMS
  • Address : http://mms.celcom.net.my
  • Press Save
Step2:

Main Menu > Messaging > Settings > Picture message

  • Select Message Server
  • Message server : mms.celcom.net.my > press OK
  • Go to Internet profile > press Edit
  • Select Celcom MMS
Step3:

To send mms

Main Menu > messaging > write new > Picture Msg


Tq http://www.channelx.com.my

Enjoy ubuntu... ;)

kunkun-laptop .... ;)