Thursday, July 28, 2011

Add Symbols to Your Facebook Updates

Ever wonder how your Facebook friends add those smiley faces, hearts, musical notes, and other cute little icons to their status updates? It's easier than you might think. Here's how:

1. Turn on your keyboard's Number Lock.

2. Hold down the Alt key, then type one of the numbers listed below on the numeric keypad. (You mustuse the keypad; the standard number keys won't work.) So, for example, to get a heart symbol, you'd press Alt-3. For a musical note, Alt-1-3 (meaning you hold down Alt, press 1, press 3, and then release the Alt key).

Here's a list of some of the more popular symbols you might want to use:

Alt-1 Happy face

Alt-2 Sad face

Alt-3 Heart

Alt-13 Single musical note

Alt-14 Double musical note

Alt-15 Sun

Alt-0169 Copyright symbol

Alt-0188 1/4 symbol

Alt-0189 1/2 symbol

If you're a laptop user and your keyboard doesn't have a numeric keypad, your best bet is to copy your desired symbol from another source, like Facebook Emoticons. Just bookmark the page and pull it up in another tab as needed.

Have fun!

Tq http://www.pcworld.com

How to Use an HTTPS-Encrypted Connection When Browsing

When you're browsing the Web, protect yourself by using HTTPS (Hypertext Transfer Protocol Secure) whenever possible. HTTPS encrypts the connection between your PC and the Website you're visiting. Though HTTPS doesn't guarantee that a site is secure, it can help prevent other parties from hacking into the network and gaining access to your account.

Many sites use HTTPS by default: When you purchase an item online or log in to online banking, for instance, your browser will probably connect to the site via HTTPS automatically. But you can go one step further by enabling HTTPS on Facebook, Twitter, and Gmail.

To use Facebook's HTTPS feature, log in to Facebook and click Accountin the upper-right corner. Select Account Settings from the drop-down menu, and look for ‘Account Security' on the resulting page. Under the Account Security heading, clickChange, check the box next to Browse Facebook on a secure connection (https) whenever possible, and click Save.

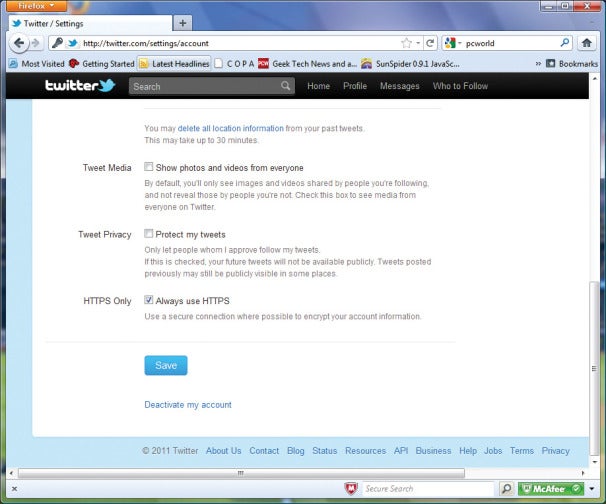
Use HTTPS security.You can easily enable HTTPS on sites such as Twitter and Facebook and on services such as Gmail to introduce an extra level of security.For Twitter, first log in to your account. If you're using the new Twitter interface, click your account name in the upper-right part of the screen, and select settings. (If you're still using the old Twitter interface, click the Settings link in the upper right of the window.) From there, scroll down to the bottom of the resulting page, check the box next to Always use HTTPS, and click Save.

To enable HTTPS on Gmail, log in to your account, click the gear icon in the upper-right corner, and select Mail Settings from the drop-down menu. Next, under the Browser Connection heading, select the button labeled Always use https. When you're all set, scroll to the bottom of the page and click Save Changes. To learn more about Gmail security, see Google's Gmail Security Checklist.


Tq http://www.pcworld.com

“Project type is not supported by this installation” error in Visual Studio 2005

  1. Start > click Run > type cmd or Windows Key + R
  2. devenv /setup
  3. regsvr32.exe "%vs80comntools%\..\IDE\projectaggregator.dll"
  4. Then download
  1. Restart

Monday, July 25, 2011

Windows 7 – 64 Bit – The ‘Microsoft.Jet.OLEDB.4.0′ provider is not registered on the local machine.

When attempting to export data from an Access database I encountered the following exception.

System.InvalidOperationException was unhandled
Message="The 'Microsoft.Jet.OLEDB.4.0' provider is not registered on the local machine."
Source="System.Data"

This error came about when I switched from a 32 bit Vista Machine to a new 64 bit Windows 7 machine.

To fix the issue simply change your build options so that the project is compiled to run as 32-bit.

Tq... :)
http://dacosta9.wordpress.com/

Creating Setup in Microsoft Visual Studio 2005 by Arif Prime

Tuesday, July 12, 2011

How to increase the server time-out in Microsoft Outlook

Outlook 2000 Corporate or Workgroup mode (CW)

  1. Start Outlook.
  2. On the Tools menu, click Services.
  3. On the Services tab, select Internet E-mail, and then click Properties.
  4. Click the Advanced tab.
  5. Gradually increase the server time-out setting until the problem is resolved.

Outlook 2000 Internet Mail Only (IMO)

  1. Start Outlook.
  2. On the Tools menu, click Accounts.
  3. Select the target account, and then click Properties.
  4. Click the Advanced tab.
  5. Gradually increase the server time-out setting until the problem is resolved.

Outlook 2002 and Outlook 2003

  1. Start Outlook.
  2. On the Tools menu, click E-mail Accounts.
  3. Click View or change existing e-mail accounts, and then click Next.
  4. Click your POP3 account, and then click Change.
  5. Click More Settings.
  6. Click the Advanced tab.
  7. Gradually increase the server time-out setting until the issue is resolved.

Outlook 2007

  1. Start Outlook.
  2. On the Tools menu, click Account Settings.
  3. Click to select the target POP3 account, and then click Change.
  4. Click More Settings.
  5. Click the Advanced tab.
  6. Gradually increase the server time-out setting until the issue is resolved.

Outlook 2010

  1. Start Outlook.
  2. On the Files menu, click Info.
  3. Click Account Settings, and then select Account Settings from the list.
  4. Click to select the target POP3 account, and then click Change.
  5. Click More Settings.
  6. Click the Advanced tab.
  7. Gradually increase the server time-out setting until the issue is resolved.

Outlook Express 5.x and 6.0

  1. Start Outlook Express.
  2. On the Tools menu, click Accounts.
  3. Click the Mail tab.
  4. Click your POP3 account, and then click Properties.
  5. Click the Advanced tab.
  6. Gradually increase the server time-out setting until the problem is resolved.

Wednesday, July 6, 2011

How to Setup Android Application Development on Eclipse

Android SDK provides the tools and APIs necessary to begin developing applications on the Androidplatform using the Java programming language. Android offers a custom plugin for the Eclipse IDE, called Android Development Tools (ADT), that is designed to give you a powerful, integrated environment in which to build Android applications.

Android 2.1 on Emulator

This tutorial is intended for new developers that want to start developing Android applications using Eclipse IDE. To start develop, you have to install Java platform (JDK) first and then install the Eclipse, Android SDK and the Android Development Tool (ADT) plugin for Eclipse.

Download and Install JDK

Download and install the latest JDK (JDK 1.6 Update 18) from JDK download page

Download and Install Eclipse IDE

Download and install Eclipse Classic 3.5 (Galileo) from Eclipse download page. You can also use the Java or RCP version of Eclipse.

Download and Install Android SDK Starter Package

The Android SDK starter package includes only a single component, the latest version of the SDK Tools. Included in that component is a tool called Android SDK and AVD Manager that you can use to download other components from the SDK repository site.

  • Download the latest Android SDK starter package from the SDK download page.
  • Unpack the archive to a suitable location on your machine. By default, the SDK files are unpacked into a directory named android-sdk- . For example, on Windows platform the directory will be android-sdk-windows.
  • Android SDK

    Android SDK

Add Android Platforms to Your SDK

To add one or more Android platforms (for example, Android 1.6 or Android 2.1) to your SDK, use the Android SDK and AVD Manager, included in the SDK starter package. It is recommended to download multiple platforms, so that you can build your application on the lowest version you want to support, but test against higher versions that you intend the application to run on.

  • Launch the Android SDK and AVD Manager on Windows by executing SDK Setup.exe at the root of the SDK directory. On Mac OS X or Linux, execute the android tool in the /tools/ folder.
  • On Available Packages menu, select the platforms to download (1.1 to 2.1).
  • If you find error on HTTP SSL while fetching the repository url , try to use http instead of https by checking the Force https://… sources to be fetched using http://… option on Settings menu.
  • Click Install Selected and then select Accept All to accept selected packages.
  • Click Install Accepted button to start download and install the selected packages.

Download and Install ADT Plugin

To install the ADT Plugin, you can take advantage of the Eclipse remote update feature. By setting up a remote update site, you can easily download, install, and check for ADT updates. Alternatively, you can download the latest ADT to your development computer as a local site archive.

  • Launch Eclipse, then select Help –> Install New Software.
  • In Available Software dialog, click Add
  • Enter a name for the remote site (ex: Android Plugin) in the Name field and in the Locationfield, enter this URL:
    https://dl-ssl.google.com/android/eclipse/
    and then click OK. If you have trouble acquiring the plugin, you can try using ‘http’ instead of ’https’ in the URL.
  • Select the checkbox next to Developer Tools, which will automatically select the nested toolsAndroid DDMS and Android Development Tools and then click Next.
  • On the next dialog, click Next to read and accept the license agreement and install any dependencies, then click Finish.
  • Restart Eclipse
  • To check whether the ADT has been installed correctly, try to create a new project by selectFile > New > Project., you shoud find Android Project listed on project wizard.

kunkun-laptop .... ;)