Saturday, October 8, 2011

How to Install Ubuntu inside Windows using VirtualBox

The first thing you have to do is obtain VirtualBox. Visit the VirtualBox website's download page.

Follow these instructions to get a Ubuntu disk image (.iso file).


After you launch VirtualBox from the Windows Start menu, click on New to create a new virtual machine. When the New Virtual Machine Wizard appears, click Next.


You can call the machine whatever you want. If you're installing Ubuntu, it makes sense to call it Ubuntu, I guess. You should also specify that the operating system is Linux.


VirtualBox will try to guess how much of your memory (or RAM) to allocate for the virtual machine. If you have 1 GB or less of RAM, I would advise you stick with the recommendation. If, however, you have over 1 GB, about a quarter your RAM or less should be fine. For example, if you have 2 GB of RAM, 512 MB is fine to allocate. If you have 4 GB of RAM, 1 GB is fine to allocate. If you have no idea what RAM is or how much of it you have, just go with the default.

Click Next.


If this is your first time using VirtualBox (which it probably is if you need a tutorial on how to use it), then you do want to Create new hard disk and then click Next.


Click Next again.


Theoretically, a dynamically expanding virtual hard drive is best, because it'll take up only what you actually use. I have come upon weird situations, though, when installing new software in a virtualized Ubuntu, in which the virtual hard drive just fills up instead of expanding. So I would actually recommend picking a Fixed-size storage.


Ubuntu's default installation is less than 4 GB. If you plan on adding software or downloading large files in your virtualized UBuntu, you should tack on some buffer.


Click Finish and wait for the virtual hard drive to be created. This is actually just a very large file that lives inside of your Windows installation.


Click Finish


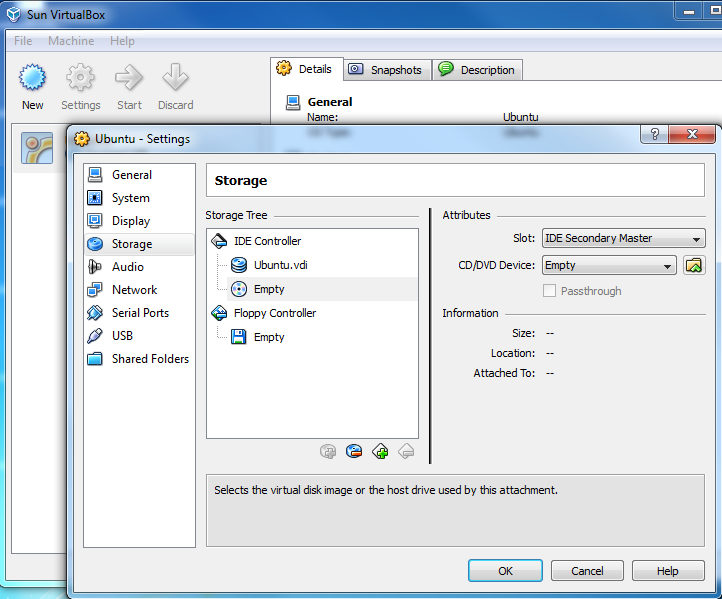
The next thing to do to make the (currently blank) virtual hard drive useful is to add the downloaded Ubuntu disk image (the .iso) boot on your virtual machine. Click on Settingsand Storage. Then, under CD/DVD Device, next to Empty, you'll see a little folder icon. Click that, and you can select the Ubuntu .iso you downloaded earlier.


Once you've selected it, click OK.

Then double-click your virtual machine to start it up.


Once it's started up, just follow the regular installation procedure as if you were installing Ubuntu on a real hard drive (instead of a virtual one).


Afterwards, in order to use your virtualized installation (instead of continually booting the live CD), you have to change the CD/DVD Device entry to be Empty again.


Tq http://www.psychocats.net

Friday, September 16, 2011

How to install Google Chrome on Ubuntu 11.04

Installing Google Chrome on Ubuntu 11.04

Google Chrome can be installed in many ways, on Ubuntu 11.04. Here I’ll explain few simple methods. You can also install Chromium (almost similar to Google Chrome), it is available in Ubuntu Software Center or Synaptic Package Manager. Just follow the steps -

step #1 : Go to its official website and download the Debian Package. Google Chrome version 10.x.* is the latest one.

Download the Google Chrome for Ubuntu 11.04

step #2 : Open the saved file with Ubuntu Software Center (Right Click on the Package, then select Open With USC; click on install Button to proceed) or Use the dpkg command to install the package. To install from the command line, type the command given below and enter your login password to proceed.

sudo dpkg -i google-chrome-stable_current_i386.deb

step #3 : That’s all.. No more steps.. Enjoy surfing with Chrome.

Why svchost.exe running in Windows?

Why Are There So Many svchost.exes Running?

If you’ve ever taken a look at the Services section in control panel you might notice that there are a Lot of services required by Windows. If every single service ran under a single svchost.exe instance, a failure in one might bring down all of Windows… so they are separated out.

Those services are organized into logical groups, and then a single svchost.exe instance is created for each group. For instance, one svchost.exe instance runs the 3 services related to the firewall. Another svchost.exe instance might run all the services related to the user interface, and so on.

So What Can I Do About It?

You can trim down unneeded services by disabling or stopping the services that don’t absolutely need to be running. Additionally, if you are noticing very heavy CPU usage on a single svchost.exe instance you can restart the services running under that instance.

The biggest problem is identifying what services are being run on a particular svchost.exe instance… we’ll cover that below.

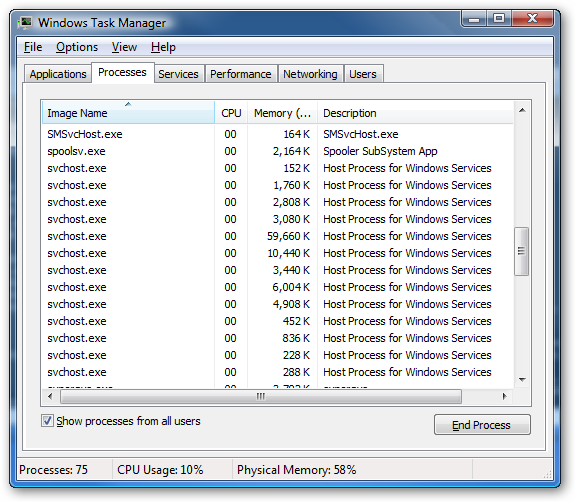
If you are curious what we’re talking about, just open up Task Manager and check the “Show processes from all users” box:

image

Checking From the Command Line (Vista or XP Pro)

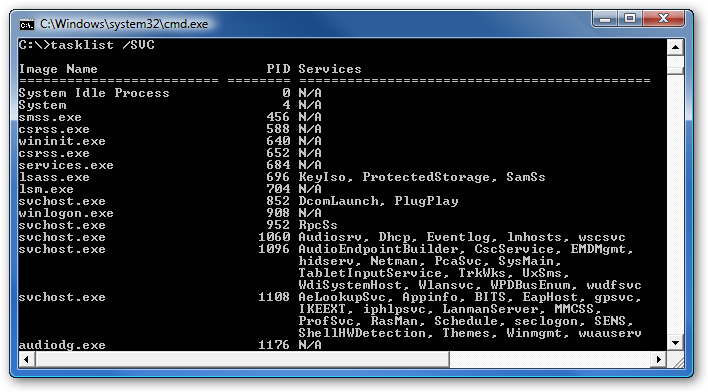
If you want to see what services are being hosted by a particular svchost.exe instance, you can use the tasklist command from the command prompt in order to see the list of services.

tasklist /SVC

image

The problem with using the command line method is that you don’t necessarily know what these cryptic names refer to.

Checking in Task Manager in Vista

You can right-click on a particular svchost.exe process, and then choose the “Go to Service” option.

image

This will flip over to the Services tab, where the services running under that svchost.exe process will be selected:

image

The great thing about doing it this way is that you can see the real name under the Description column, so you can choose to disable the service if you don’t want it running.

Using Process Explorer in Vista or XP

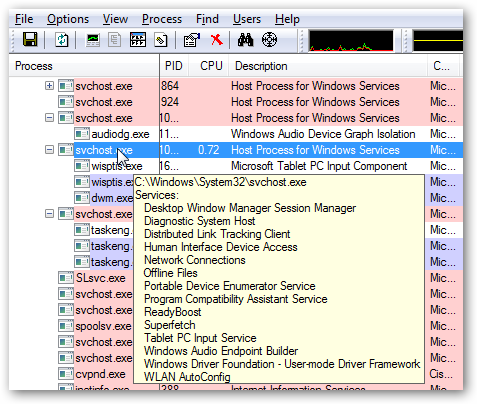
You can use the excellent Process Explorer utility from Microsoft/Sysinternals to see what services are running as a part of a svchost.exe process.

Hovering your mouse over one of the processes will show you a popup list of all the services:

image

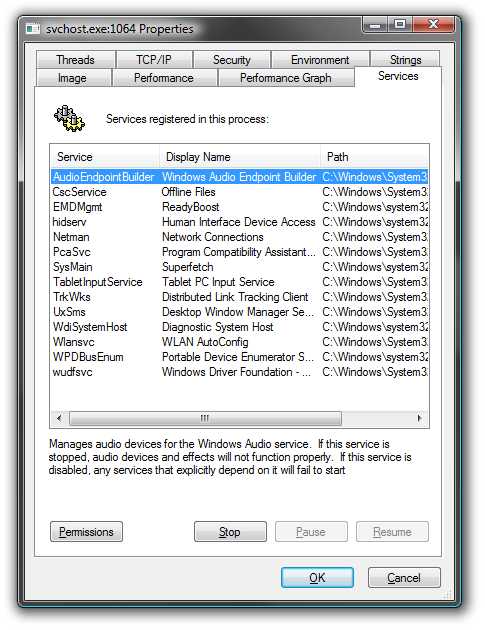
Or you can double-click on a svchost.exe instance and select the Services tab, where you can choose to stop one of the services if you choose.

image

Disabling Services

Open up Services from the administrative tools section of Control Panel, or typeservices.msc into the start menu search or run box.

Find the service in the list that you’d like to disable, and either double-click on it or right-click and choose Properties.

image

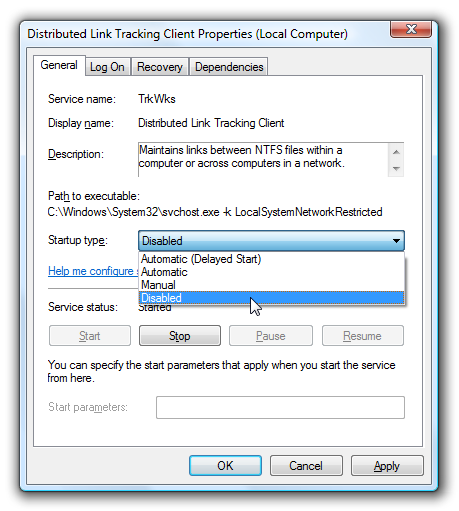
Change the Startup Type to Disabled, and then click the Stop button to immediately stop it.

image

You could also use the command prompt to disable the service if you choose. In this command “trkwks” is the Service name from the above dialog, but if you go back to the tasklist command at the beginning of this article you’ll notice you can find it there as well.

sc config trkwks start= disabled

Hopefully this helps somebody!


What is svchost.exe?


You are no doubt reading this article because you are wondering why on earth there are nearly a dozen processes running with the name svchost.exe. You can’t kill them, and you don’t remember starting them… so what are they?

So What Is It?

According to Microsoft: “svchost.exe is a generic host process name for services that run from dynamic-link libraries”. Could we have that in english please?

Some time ago, Microsoft started moving all of the functionality from internal Windows services into .dll files instead of .exe files. From a programming perspective this makes more sense for reusability… but the problem is that you can’t launch a .dll file directly from Windows, it has to be loaded up from a running executable (.exe). Thus the svchost.exe process was born.


Thursday, September 15, 2011

How to Install Ubuntu Netbook Edition with Wubi Installer

Ubuntu is one of the most popular versions of Linux, and their Netbook Remix edition is especially attractive for netbook owners. Here we’ll look at how you can easily try out Ubuntu on your netbook without a CD/DVD drive.

Netbooks, along with the growing number of thin, full powered laptops, lack a CD/DVD drive. Installing software isn’t much of a problem since most programs, whether free or for-pay, are available for download. Operating systems, however, are usually installed from a disk. You can easily install Windows 7 from a flash drive with our tutorial, but installing Ubuntu from a USB flash drive is more complicated. However, using Wubi, a Windows installer for Ubuntu, you can easily install it directly on your netbook and even uninstall it with only a few clicks.

Getting Started

Download and run the Wubi installer for Ubuntu (link below). In the installer, select the drive you where you wish to install Ubuntu, the size of the installation (this is the amount dedicated to Ubuntu; under 20Gb should be fine), language, username, and desired password. Also, from the Desktop environment menu, select Ubuntu Netbook to install the netbook edition. Click Install when your settings are correct.

sshot-434

Wubi will automatically download the selected version of Ubuntu and install it on your computer.

sshot-437

Windows Firewall may ask if you want to unblock Wubi; select your network and click Allow access.

sshot-438

The download will take around an hour on broadband, depending on your internet connection speed. Once the download is completed, it will automatically install to your computer. If you’d prefer to have everything downloaded before you start the install, download the ISO of Ubuntu Netbook edition (link below) and save it in the same folder as Wubi.

image

Then, when you run Wubi, select the netbook edition as before and click Install. Wubi will verify that your download is valid, and will then proceed to install from the downloaded ISO. This install will only take about 10 minutes.

sshot-443

Once the install is finished you will be asked to reboot your computer. Save anything else you’re working on, and then reboot to finish setting up Ubuntu on your netbook.

sshot-444

When your computer reboots, select Ubuntu at the boot screen. Wubi leaves the default OS as Windows 7, so if you don’t select anything it will boot into Windows 7 after a few seconds.

sshot-547

Ubuntu will automatically finish the install when you boot into it the first time. This took about 12 minutes in our test.

sshot-554

When the setup is finished, your netbook will reboot one more time. Remember again to select Ubuntu at the boot screen. You’ll then see a second boot screen; press your Enter key to select the default.

sshot-2010-05-17-[11-36-08]

Ubuntu only took less than a minute to boot in our test. When you see the login screen, select your name and enter your password you setup in Wubi. Now you’re ready to start exploring Ubuntu Netbook Remix.

sshot-2010-05-17-[11-38-48]

Using Ubuntu Netbook Remix

Ubuntu Netbook Remix offers a simple, full-screen interface to take the best advantage of netbooks’ small screens. Pre-installed applications are displayed in the application launcher, and are organized by category. Click once to open an application.

image

The first screen on the application launcher shows your favorite programs. If you’d like to add another application to the favorites pane, click the plus sign beside its icon.

image

Your files from Windows are still accessible from Ubuntu Netbook Remix. From the home screen, select Files & Folders on the left menu, and then click the icon that says something like 100GB Filesystem under the Volumes section.

image

Now you’ll be able to see all of your files from Windows. Your user files such as documents, music, and pictures should be located in Documents and Settings in a folder with your user name.

image

You can also easily install a variety of free applications via the Software Installer.

image

Connecting to the internet is also easy, as Ubuntu Netbook Remix automatically recognized the WiFi adaptor on our test netbook, a Samsung N150. To connect to a wireless network, click the wireless icon on the top right of the screen and select the network’s name from the list.

image

And, if you’d like to customize your screen, right-click on the application launcher and selectChange desktop background.

image

Choose a background picture you’d like.

image

Now you’ll see it through your application launcher. Nice!

image

Most applications are opened full-screen. You can close them by clicking the x on the right of the program’s name.

image

You can also switch to other applications from their icons on the top left. Open the home screen by clicking the Ubuntu logo in the far left.

image

Changing Boot Options

By default, Wubi will leave Windows as the default operating system, and will give you 10 seconds at boot to choose to boot into Ubuntu. To change this, boot into Windows and enter Advanced system settings in your start menu search.

image

In this dialog, click Settings under Startup and Recovery.

image

From this dialog, you can select the default operating system and the time to display list of operating systems. You can enter a lower number to make the boot screen appear for less time.

image

And if you’d rather make Ubuntu the default operating system, select it from the drop-down list.

image

Uninstalling Ubuntu Netbook Remix

If you decide you don’t want to keep Ubuntu Netbook Remix on your computer, you can uninstall it just like you uninstall any normal application. Boot your computer into Windows, open Control Panel, click Uninstall a Program, and enter ubuntu in the search box. Select it, and click Uninstall.

image

Click Uninstall at the prompt. Ubuntu uninstalls very quickly, and removes the entry from the bootloader as well, so your computer is just like it was before you installed it.

sshot-2010-05-17-[11-51-59]

Conclusion

Ubuntu Netbook Remix offers an attractive Linux interface for netbooks. We enjoyed trying it out, and found it much more user-friendly than most Linux distros. And with the Wubi installer, you can install it risk-free and try it out on your netbook. Or, if you’d like to try out another alternate netbook operating system, check out our article on Jolicloud, another new OS for netbooks.

Links

Download Wubi Installer for Windows

Download Ubuntu Netbook Edition


kunkun-laptop .... ;)