- Enable IMAP in Gmail. Make sure you click Save Changes when you're done.
- Open Thunderbird, and select Tools > Account Settings.
- Click Add Account.
- Select the Email account radio button and click Next. The Identity screen appears.
- Enter your full name in the Your Name field. Enter your Gmail address (username@gmail.com) in the Email Address field, and click Next. Google Apps users, enter your full address in the format username@your_domain.com
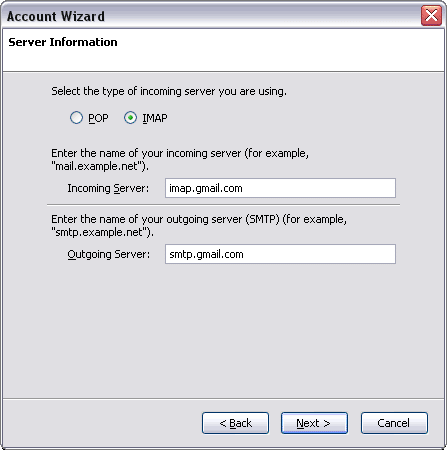
- Select IMAP as the type of incoming server you are using. Enter imap.gmail.com in the Incoming Server field.
- Set the Outgoing Server to smtp.gmail.com and click Next.
- Enter your full email address (including @gmail.com @your_domain.com) in the Incoming User Name and Outgoing User Name fields, and click Next.
- Enter a name for your email account in the Account Name field, and click Next.
- Verify your account information in the dialog box, and click Finish.
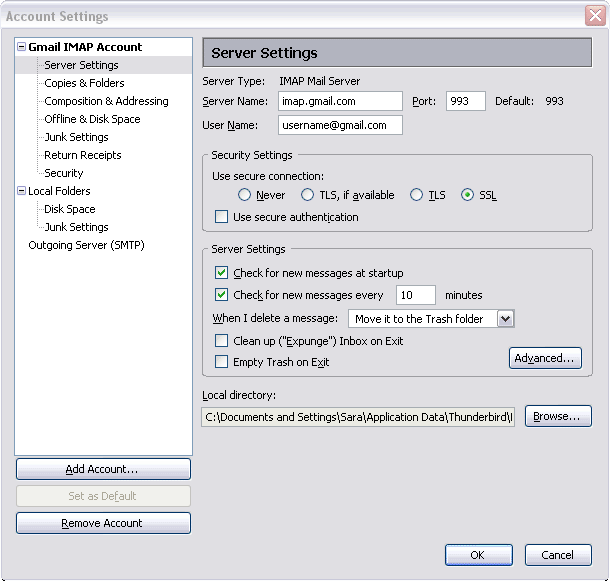
- Select Server Settings from the folder list below your new account.
- Update the Port value to 993.
- In the Security Settings section, select SSL from the Use secure connection options.
- Select the 'Check for messages at startup' checkbox and the 'Check for new messages every 10 minutes' checkbox.
- Click Outgoing Server (SMTP) in the folder list.
- Select the smtp.gmail.com (Default) entry from the list and click Edit. The SMTP Server page appears.
- Enter smtp.gmail.com as the Server Name and set the Port to 587.
- Select User name and password and enter your full email address (including @gmail.com or @your_domain.com) in the User Name field.
- Select TLS from the Use secure connection radio buttons and click OK.
- Click OK to save your changes and exit the Account Settings dialog.
- Check our recommended client settings, and adjust your client's settings as needed.


Enjoy ubuntu... ;)
No comments:
Post a Comment