Thursday, July 16, 2009

How to set up your Thunderbird client to work with Gmail

  1. Enable IMAP in Gmail. Make sure you click Save Changes when you're done.
  2. Open Thunderbird, and select Tools > Account Settings.
  3. Click Add Account.
  4. Select the Email account radio button and click Next. The Identity screen appears.
  5. Enter your full name in the Your Name field. Enter your Gmail address (username@gmail.com) in the Email Address field, and click Next. Google Apps users, enter your full address in the format username@your_domain.com
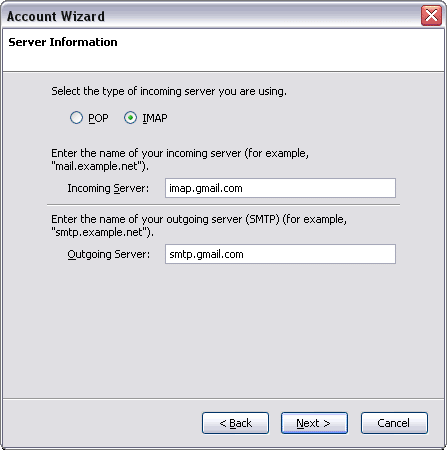
  6. Select IMAP as the type of incoming server you are using. Enter imap.gmail.com in the Incoming Server field.
  7. Set the Outgoing Server to smtp.gmail.com and click Next.
  8. Enter your full email address (including @gmail.com @your_domain.com) in the Incoming User Name and Outgoing User Name fields, and click Next.
  9. Enter a name for your email account in the Account Name field, and click Next.
  10. Verify your account information in the dialog box, and click Finish.
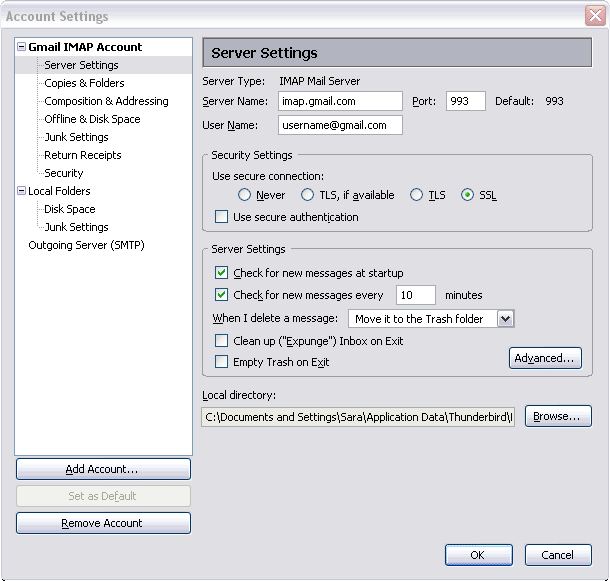
  11. Select Server Settings from the folder list below your new account.
  12. Update the Port value to 993.
  13. In the Security Settings section, select SSL from the Use secure connection options.
  14. Select the 'Check for messages at startup' checkbox and the 'Check for new messages every 10 minutes' checkbox.
  15. Click Outgoing Server (SMTP) in the folder list.
  16. Select the smtp.gmail.com (Default) entry from the list and click Edit. The SMTP Server page appears.
  17. Enter smtp.gmail.com as the Server Name and set the Port to 587.
  18. Select User name and password and enter your full email address (including @gmail.com or @your_domain.com) in the User Name field.
  19. Select TLS from the Use secure connection radio buttons and click OK.
  20. Click OK to save your changes and exit the Account Settings dialog.
  21. Check our recommended client settings, and adjust your client's settings as needed.
Tq Gmail Help

Enjoy ubuntu... ;)

How to Compiling Thunderbird and Enigmail source code on Ubuntu

The build instructions require you to first build part of Thunderbird before compile Enigmail.

I spent that effort anyway, and here is what I did:

First, download any packages required to build Thunderbird:

Qoute : $ sudo apt-get build-dep thunderbird
Quote : $sudo apt-get install mercurial libasound2-dev libcurl4-openssl-dev libnotify-dev

Then, make a new directory somewhere, download the Thunderbird source and build it:
Qoute : $ mkdir proj
Qoute : $ cd proj
Qoute : $ sudo apt-get -b source thunderbird

This will take a while. Really. Go and make a cup of tea.

When it’s done, you need to download Enigmail and unpack it in to the right place. Note that your “thunderbird-2.0.0.17+nobinonly” directory might be called something slightly different. Also note that I’m using Enigmail 0.95.7, but you should check for the latest version.

Qoute : $ cd thunderbird-2.0.0.17+nobinonly/build-tree/mozilla/mailnews/extensions
Qoute : $ wget http://www.mozilla-enigmail.org/download/source/enigmail-0.95.7.tar.gz
or you just download direct from Engimail website
Qoute : $ tar -zxvf enigmail-0.95.7.tar.gz

Next, you need to create a config file:

Qoute : $ cd ../..
Qoute : $ echo . $topsrcdir/mail/config/mozconfig > .mozconfig
Qoute : $ echo ac_add_options --disable-tests >> .mozconfig
Qoute : $ echo ac_add_options --disable-debug >> .mozconfig
Qoute : $ echo ac_add_options --enable-crypto >> .mozconfig
Qoute : $ echo ac_add_options --enable-optimize >> .mozconfig
Qoute : $ echo ac_add_options --enable-static-mail >> .mozconfig
Qoute : $ echo ac_add_options --enable-application=mail >> .mozconfig
Qoute : $ echo mk_add_options MOZ_CO_PROJECT=mail >> .mozconfig

Then build Enigmail and make an XPI:

Qoute : $ cd mailnews/extensions/enigmail
Qoute : $ ./makemake -r
Qoute : $ make
Qoute : $ make xpi
Qoute : $ cd ../../../dist/bin
Qoute : $ ./thunderbird

The resulting XPI file is stored in the “dist/bin” directory you’re now in. To install the extension, you have fire-up Thunderbird, go to Tools->Add-ons->Extensions, click “Install…” and go and find it.

Tq http://www.waxworlds.org/

Enjoy ubuntu... ;)

How to install OCR for PDF in ubuntu

To get OCR in Ubuntu, you need to use the Open-Source Tesseract OCR engine. However, it can only perform OCR on the TIFF format. In order to allow it to do PDF, we also need the Evince PDF reader to allow us to export a page to TIFF to feed Tesseract with.

Install Evince PDF reader

Quote : $ sudo apt-get install evince

Install tesseract in Ubuntu:

Quote : $ sudo apt-get install tesseract-ocr

Now, get the TIFF from Evince; Right click the page and click “Save image as…” and export the file. Then, to get a good OCR we need to convert it to monochrome.


Quote : $ tesseract foo.tif bar
Unable to load unicharset file /usr/share/tesseract-ocr/tessdata/eng.unicharset

If the above bug happens, fix it by:

Quote : $ sudo apt-get install tesseract-ocr-eng

This is caused by a nasty bug in Ubuntu.

And now finally, do:

Quote : $ tesseract foo.tif bar# and without the .txt extension, or you will end up with bar.txt.txt

to complete it!

Tq http://www.compdigitec.com/

Enjou ubuntu... ;)

Wednesday, July 15, 2009

How to restore Grub from a livecd ubuntu

This will restore grub if you already had grub installed but lost it to a windows install or some other occurence that erased/changed your MBR so that grub no longer appears at start up or it returns an error.

Quote : sudo grub
This will get you a "grub>" prompt (i.e. the grub shell). At grub>. enter these commands

Quote : find /boot/grub/stage1
This will return a location. If you have more than one, select the installation that you want to provide the grub files.
Next, THIS IS IMPORTANT, whatever was returned for the find command use it in the next line (you are still at grub>. when you enter the next 3 commands)

Quote : root (hd?,?)
Again use the value from the find command i.e. if find returned (hd0,9) then you would enter root (hd0,9)

Next enter the command to install grub to the mbr

Quote : setup (hd0)
Finally exit the grub shell
Quote : quit
That is it. Grub will be installed to the mbr.
When you reboot, you will have the grub menu at startup.

Enjoy ubuntu... ;)

Tuesday, July 14, 2009

How to install windows xp on presario cq40-337TU

1) nLite(download here), a free tool to help you slipstreaming(integrate) your SATA drivers into WinXp installation disk.
2) Extracted SATA drivers(if you are using Intel chipset Intel 82801GR/GH, 631xESB/632xESB, 82801GHM, ICH8R/ICH9R, 82801HEM SATA RAID Controller, get the drivers from here)

Steps:
1) Get your Windows XP installation disk and copy the contents to a new folder(I named it "WinXp").

2) Extract the SATA drivers you downloaded into a folder, namely "Floppy 32Bit". (Need help for "Extracting SATA driver from their EXE without Floppy Disk(FD)")

3) Run nLite->choose "Next".


4) Now, locate the Windows folder(for me, it's "WinXp").


5) Next again and you will come to "Presets". Ignore this by choosing "Next" again.


6) In "Task Selection", choose "Drivers" and "Bootable ISO" by high-lighting them.


7) Choose "Insert"->"Single driver"


8) Browse to the SATA driver folder(I named it "Floppy 32Bit") and select either one of the .INF file, I choose "iaahci.inf".


9) A screen like below will pop-up, make sure it's "Textmode driver" and select all of them by holding CTRL+A key and choose "OK"


10) You shall see something like this. Choose "Next" and you will be prompted.


11) Choose "Yes" to start the process.


12) Let it finish and choose "Next".


13) Finally, you can create your project as ISO image or burn it directly to CD-R under "Mode". I choose "Direct Burn". You can put anything for "Label" but not too long. Choose "Burn" and you will be prompted again.


14) Choose "Yes" to burn it to CD-R. Wait for it to finish and choose "Next"


15) Choose "Finish" to exit nLite.


Tq http://maxeasyguide.blogspot.com/

Enjoy ubuntu... ;)

How to Import MySQL using the command in ubuntu

Quote : kunkun@kunkun:~$ mysql -u {database_username} -p {database_name} < mysqlbackup.sql

Enjoy ubuntu... ;)

How to Export MySQL using the command in ubuntu

Quote : kunkun@kunkun:~$ mysqldump -u {database_username} -p {database_name} > mysqlbackup.sql

Enjoy ubuntu... ;)

How to check MySQL Version on command line

# mysql –version
or
# mysql -V

C:\xampp\mysql\bin>mysql -V
mysql Ver 14.12 Distrib 5.0.51a, for Win32 (ia32)

Enjoy ubuntu... ;)

Friday, July 10, 2009

How to add a column to an existing MySQL table

To add a column called email to the contacts table created in Create a basic MySQL table with a datatype of VARCHAR(80), use the following SQL statement:

ALTER TABLE contacts ADD email VARCHAR(60);

This first statement will add the email column to the end of the table. To insert the new column after a specific column, such as name, use this statement:

ALTER TABLE contacts ADD email VARCHAR(60) AFTER name;

If you want the new column to be first, use this statement:

ALTER TABLE contacts ADD email VARCHAR(60) FIRST;


Enjoy ubuntu... ;)

Thursday, July 9, 2009

How to compile enigmail module on thunderbird

Compiling Enigmail

1. After compiling Mozilla Thunderbird, obtain the source code for the Enigmail module as described earlier.

2. Download the Enigmail Module(http://www.mozilla-enigmail.org/download/source/enigmail-0.95.7.tar.gz) tarball and extract it to a convenient location.

3. Copy enigmail folder to c:\proj\mozilla\THUNDERBIRD\mailnews\extensions\

4. Navigate into enigmail folder
cd THUNDERBIRD/mailnews/extensions/enigmail
Izhar@izhar /c/proj/mozilla/THUNDERBIRD/mailnews/extensions/enigmail

5. Compile enigmail module
./makemake -r
make

Packaging Enigmail XPI's
To allow others to use your compiled version of Enigmail, you need to create the XPI file(s) containing the Enigmail binaries. To build the Enigmail XPI run:

make xpi

from the same directory where you compiled Enigmail.

This will create enigmail--.xpi in the mozilla/dist/bin (or OBJDIR/dist/bin) folder.

Enjoy ubuntu... ;)

How to compile and run thunderbird source code on Windows

Compiling thunderbird
1. Download all the required software's

2. Install Microsoft Visual Studio 6

3. To use Visual C++ 6, you must be sure that you have applied Visual Studio Service Pack 5 (http://msdn.microsoft.com/en-us/vstudio/aa718363.aspx) and the Visual C++ 6.0 Processor Pack (http://msdn.microsoft.com/en-us/vs2005/aa718349.aspx). (The processor pack is not available for Visual Studio Service Pack 6)

4. Dowload and Install Mozilla Build 1.3
The MozillaBuild package contains the other software prerequisites necessary for building Mozilla. This includes the MSYS build environment, Mercurial, CVS, Python, NSIS, and UPX, as well as optional/useful tools such as wget, autoconf-2.13, xemacs.

http://ftp.mozilla.org/pub/mozilla.org/mozilla/libraries/win32/MozillaBuildSetup-1.3.exe

By default, the package installs to c:\mozilla-build. It is recommended to use the default path. The installer does not modify the Windows registry.

5. Run start-msvc6.bat in the c:\mozilla-build directory which will open up an application window with MINGW32 (referred to as MSYS).

Note: MSYS is a collection of GNU utilities such as bash, make, gawk and grep to allow building of applications and programs which depend on traditionally UNIX tools to be present. It is intended to supplement MinGW and the deficiencies of the cmd shell.

5. Now that the MSYS window is open (it will look something like command prompt), navigate your way back to the root c:\ .Once you are in c:\ do the following in the MSYS console window:
i) Make a new directory called proj, using the below command.
mkdir proj

ii) Navigate into proj directory
cd proj
Izhar@izhar /c/proj

iii) Download the latest Thunderbird(http://releases.mozilla.org/pub/mozilla.org/thunderbird/releases/latest/source/) tarball and extract it to a convenient location. This will create a mozilla folder, which is the root of the build tree.

iv) Copy folder mozilla into c:\proj\

v) Navigate into mozilla directory
cd mozilla
Izhar@izhar /c/proj/mozilla

vi) Create MOZ file ".mozconfig" which contains all the build options
# Options for client.mk.
mk_add_options MOZ_CO_PROJECT=mail
mk_add_options MOZ_OBJDIR=@TOPSRCDIR@/THUNDERBIRD

# Options for 'configure' (same as command-line options).
ac_add_options --enable-application=mail
ac_add_options --enable-debug
ac_add_options --disable-static
ac_add_options --disable-optimize
ac_add_options --disable-vista-sdk-requirements

( Note: for windows XP wpcapi.h is not supporting to overcome this issue we need to addd additional parameter in .mozconfig file
ac_add_options --disable-vista-sdk-requirements )

vii) Paste ".mozconfig" file into c:\proj\mozilla\

viii) Build the source code
make -f client.mk build MOZ_CO_PROJECT=mail

iv) Once the source code is built, you should have directory THUNDERBIRD. To run Thunderbird, run Thunderbird.exe located in c:\proj\mozilla\THUNDERBIRD\dist\bin

Enjoy ubuntu... ;)

kunkun-laptop .... ;)