Thursday, August 26, 2010

Apt-fast and Axel: Faster apt-get Installations and Upgrades

Apt-fast script that combines the power of the axel download manager with the stability of apt-get.


Install axel in ubuntu

First you need to install axel in ubuntu using the following comamnd from your terminal

sudo apt-get install axel

Now you need to download apt-fast script from here.Then, just place the script somewhere (/usr/bin or /usr/sbin is ideal), rename it to apt-fast (without the .sh extension)

sudo mv apt-fast.sh apt-fast

now you need to change the permissions to downloaded script

sudo chmod +x apt-fast

Using apt-fast

Once done, just use it like apt-get. To install a single package, make sure your database is up to date (apt-fast update), and run apt-fast install packagenamehere. Watch it download with incredible speed, and install your requested packages. To upgrade or dist-upgrade, do the same thing. Just use apt-fast dist-upgrade or apt-fast upgrade.

Should your download stall for any number of reasons, you’ll need to do an apt-fast clean.

Enjoy ubuntu... ;)

How to install Axel in ubuntu

Axel

Axel is a command-line downloader for unix-like operating systems. Unlike wget, axel includes download acceleration, whicThis program tries to accelerate the downloading process by using multiple connections for one file. Starting from version 0.97, the program can use multiple mirrors for one download as well. The program tries to be as light as possible (25-30k in binary form), so it might be useful as a wget clone on byte-critical systems.

Install axel in Ubuntu

sudo aptitude install axel


Enjoy ubuntu... ;)

Tuesday, August 17, 2010

How to Fix for: Parse error: syntax error, unexpected $end in

Problem

The site was built using Joomla! 1.5, so I enabled debugging mode and set the error reporting level to maximum to know what is the problem.

Then this error was displayed when opening any page:

Parse error: syntax error, unexpected $end in filename:lineno


Solution

it was the index.php / template.php / etc file of the template, and after some debugging I found that the problem is the using of short php tags, like this:
< ?
The server was not configured to allow short tags.
For maximum compatibility, it is preferred to use full tags, like this:
< ?php
Hope this help you all!

How to Enable Legacy Mode in Joomla! 1.5

The future of Joomla! CMS, Jomla! version 1.5, has new framework with code based for the Joomla! core completely re-written and built with PHP 5. Thus, a lot of existing extensions, plugins, templates and modules for Joomla! version 1.0.x does not work or fail to work properly in the Joomla! 1.5, sometimes not even able to upload and install the package. Users will get error messages such as “Direct Access to this location is not allowed” and “Must Enable Legacy Mode In Global Config To Complete This Task.” Joomla! developers is kind enough to provide a legacy mode in Joomla! 1.5 that supports compatibility with extensions designed and developed for older version of Joomla.

So how to enable and switch on legacy mode in Joomla! 1.5? In early beta release of Joomla! 1.5 (e.g. beta1 and beta2), option to enable and turn on the legacy mode is part of the Global Configuration. However, in the latest RC release of Joomla! (i.e Joomla! 1.5RC3) and final gold release of Joomla! 1.5, the legacy mode support has been moved to be provided by plugin. Thus to enable the legacy mode, simply follow steps in trick below to publish the Legacy Mode plug-in.

  1. Login to Joomla! 1.5 Site Administrator panel (http://www.domain.com/administrator).
  2. Mouse over Extensions in the main horizontal menu, then click on Plugin Manager.

    Joomla Plugin Manager

  3. Locate plugin named System – Legacy, and then click on the check box in front of it.
  4. Click on Enable button.

    Enable Joomla 1.5 Legacy Mode

  5. Ensure that Legacy: 1.0 status appears on the top right corner, and the Enabled column for “System – Legacy” is ticked. The Legacy Mode has been enabled.

    Joomla! 1.5 Legacy Mode 1.0 Compatibility Mode

With Legacy Mode, users can now use extensions, modules, plugins and templates from Joomla! 1.0.x series in Joomla! 1.5 and ensure that the modules are working properly. Joomla! 1.5 now is compatible with Joomla! 1.0.

Note that if you don’t install and populate Joomla! with sample data when installing Joomla!, the default modules and plugins are not loaded into the Site Administrator Panel. If you cannot find the Legacy Module plugin, try to build the sample data again.

Tuesday, August 3, 2010

How to Setup a Dual Boot Installation with Windows 7 and XP

METHOD ONE

When XP is Installed First

NOTE: If you have a RAID setup, you will need to have the Windows 7 RAID drivers on a USB flash drive available to select and load while installing Windows 7.
1. To Create a New Partition from the XP Hard Disk Drive
A) With your Windows 7 installation disc boot into the Command Prompt from the System Recovery Options screen.
NOTE: Make sure that the CD/DVD drive is selected first in the boot order in the BIOS.

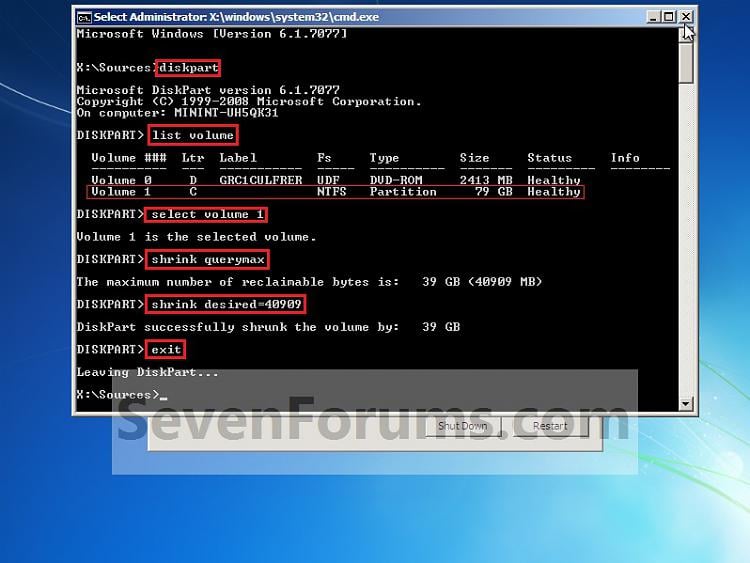
B) In the command prompt, select and shrink the XP volume by how many MB (1024 MB = 1 GB) you want to have for this Windows 7 partition. (See screenshot below)
NOTE: You would do steps 2 to 9 in METHOD TWO at that link. Windows 7 will need a minimum of 16 GB (16384 MB).
Dual Boot Installation with Windows 7 and XP-xp-w7_1.jpg
C) Click on the X at the top right corner to close the command prompt. (See screenshot above)

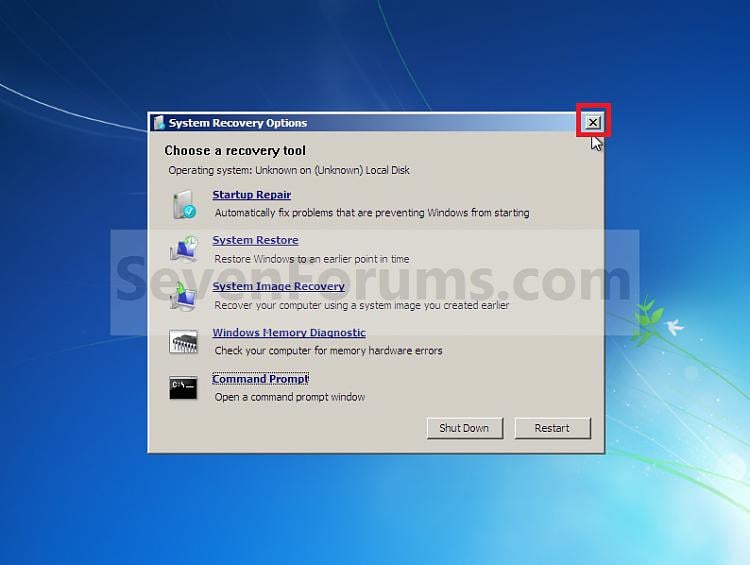
D) Click on the X at the top right corner to close System Recovery Options. (See screenshot below)
Dual Boot Installation with Windows 7 and XP-xp-w7_2.jpg
E) Go to step 3.
2. To Use a Separate Hard Disk Drive than the XP Drive
A) Boot from your Windows 7 installation disc.
NOTE: Make sure that the CD/DVD drive is selected first in the boot order in the BIOS.
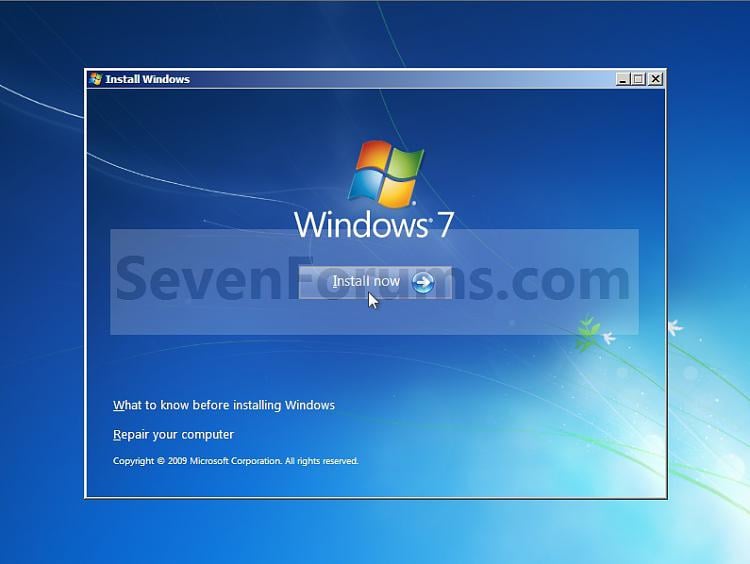
3. Click on the Install now button. (See screenshot below)
Dual Boot Installation with Windows 7 and XP-xp-w7_3.jpg
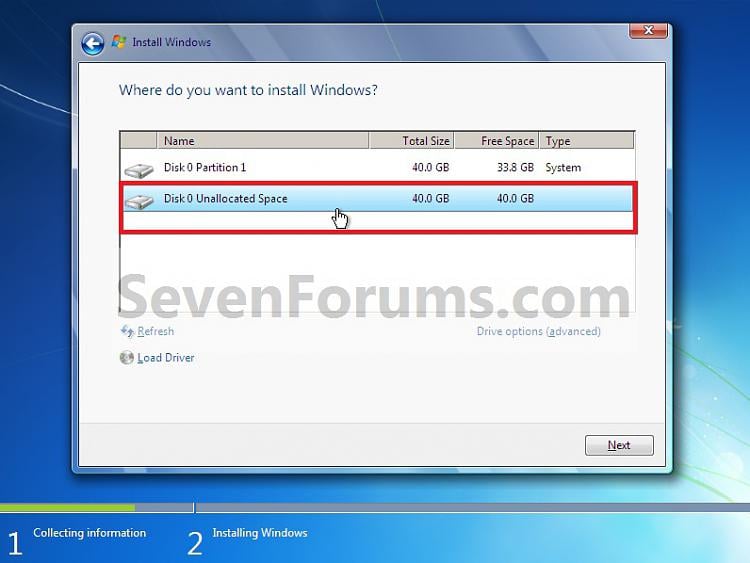
4. When you get to this point, select the partition (step 1) or hard drive to install Windows 7 on. (See screenshot below)
Dual Boot Installation with Windows 7 and XP-xp-w7_4.jpg
5. Finish installing Windows 7.
NOTE: You would do step 9 on at that link to finish installing Windows 7.

6. When finished, restart the computer to have the option to boot from XP (Earlier Verision of Windows) or Windows 7. (See screenshot below)
Note Note
If you are only booting into Windows 7 and do not have XP listed in the Windows Boot Manager, then you can install only EasyBCD (step 7 Method Two below) or EasyBCD (preferred) to add XP (or Windows 7) while started in Windows 7 the same way to the boot list.
Click image for larger version    Name: Example.jpg  Views: 16496  Size: 146.9 KB  ID: 9098


METHOD TWO

When Windows 7 is Installed First


warning Warning
1. To Create a New Partition from the Windows 7 Hard Disk Drive
NOTE: If you want to install XP on a separate hard drive instead, then skip this step and go to step 2.
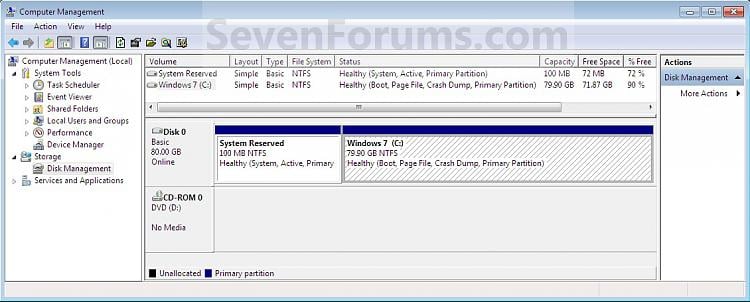
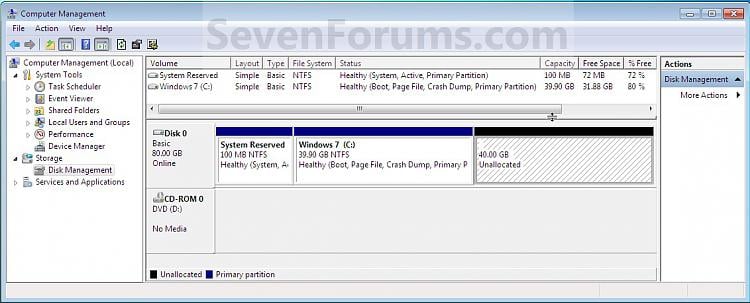
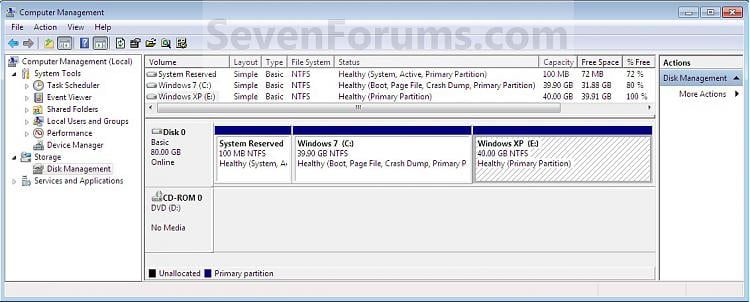
A) In Windows 7, select and shrink the Windows 7 volume in Disk Management by how many MB (1024 MB = 1 GB) you want to have for this XP partition. (See screenshots below)
NOTE: You would do all of Method One at that link.
Dual Boot Installation with Windows 7 and XP-w7-xp-1.jpg

Dual Boot Installation with Windows 7 and XP-w7-xp-2.jpg

Dual Boot Installation with Windows 7 and XP-w7-xp-3.jpg
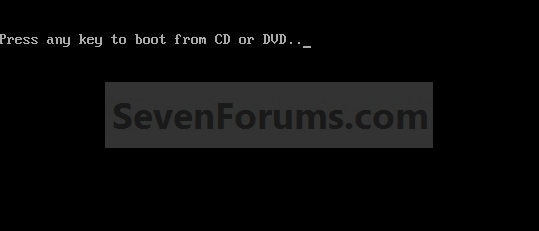
2. Insert your XP installation disc, then restart the computer and press any key to boot from it when prompted. (See screenshot below)
NOTE: Make sure that the CD/DVD drive is selected first in the boot order in the BIOS.
Dual Boot Installation with Windows 7 and XP-step1.jpg
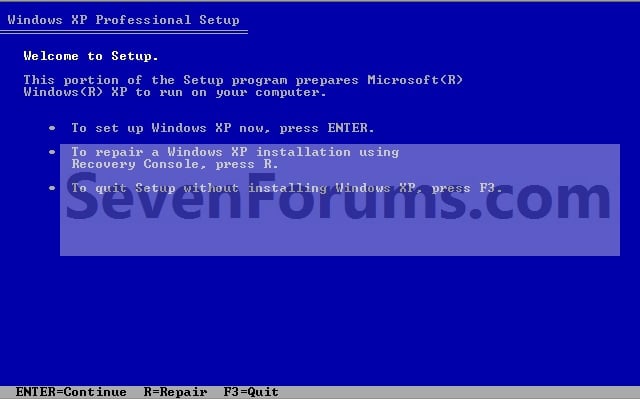
3. From XP Setup, Press Enter. (See screenshot below)

warning Warning
Dual Boot Installation with Windows 7 and XP-w7-xp-4.jpg
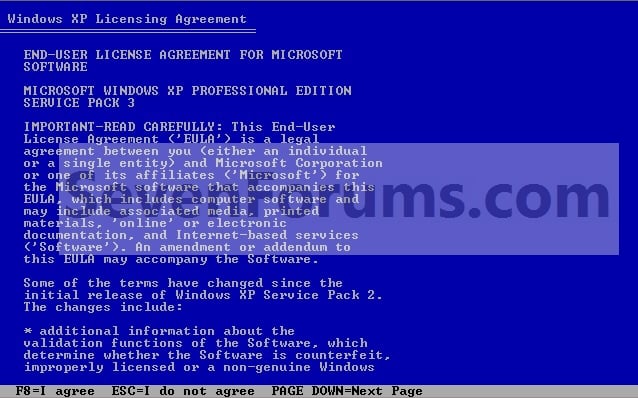
4. Press F8. (See screenshot below)
NOTE: On some multimedia keyboards, you may need to press the F-Lock or Function key before pressing F8.
Dual Boot Installation with Windows 7 and XP-w7-xp-5.jpg
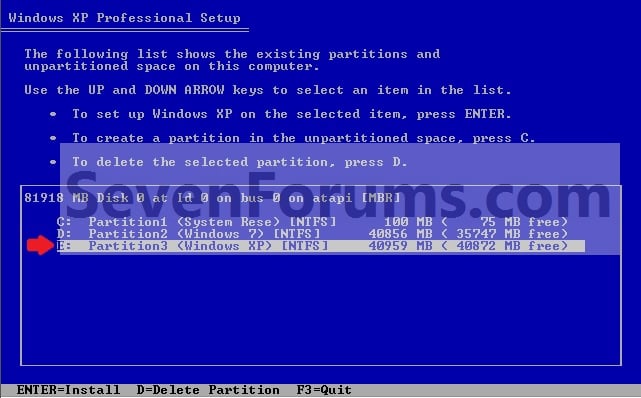
5. Select the partition (step 1) or hard drive that you want to install XP on using the arrow keys and press Enter.
Dual Boot Installation with Windows 7 and XP-w7-xp-6.jpg
6. Finish installing XP.
Tip Tip
If you get Error loading Operating System after XP restarts:
  • Using your Windows 7 installation disc, boot to the command prompt at startup.
  • Type in these comands below, and press enter after each one.
    • bootrec /FixMbr
    • bootrec /FixBoot
    • bootrec /RebuildBcd
  • Exit the command prompt and restart the computer.
  • At this point, Windows 7 should boot up the same way before trying to install XP.
  • Continue to step 8 below and run EasyBCD from Windows 7 instead.


7. In XP, download and install .Net Framework 2.0 (32-bit) verison or .Net Framework 2.0 (64-bit) version and EasyBCD for your 32-bit (x86) or 64-bit (x86) XP.
NOTE: In XP, Net Framework is required to be installed to run the free program EasyBCD.

8. Run EasyBCD.
NOTE: This is required to repair the Windows 7 boot file and add XP to the Windows Boot Manager list.

9. In EasyBCD, click on Add/Remove Entries (left side). (See screenshot below)
Dual Boot Installation with Windows 7 and XP-w7-xp-7.jpg
10. In the bottom right section under Add and Entry, type Microsoft Windows XP (name displayed in Windows Boot Manager) for the Name.
NOTE: You can type whatever name you would like to have displayed in the Windows Boot Manager for XP though.
A) If you have a 100mb System Reserved partition with Windows 7, then right click it in Disk Management and give it a drive letter ( S is a good choice). Then select the letter you assigned (ex: S ) in the EasyBCD Drive drop down menu.

OR

B) If you don't have a 100mb System Reserved partition with Windows 7, then select the drive letter (ex: C: ) that Windows 7 is installed on from the Drive drop down menu in EasyBCD.
11. To the right of Type, select Windows NT/2k/XP/2k3 from the drop down menu.
12. Click on the Add Entry button. (See screenshot above)

13. You will now notice that this has added Microsoft Windows XP to the upper right section. Click on the Save button. (See screenshot below)
Dual Boot Installation with Windows 7 and XP-w7-xp-8.jpg
14. In EasyBCD, click on Manage Bootloader (left side). (See screenshot below)
Dual Boot Installation with Windows 7 and XP-w7-xp-9.jpg
15. In the upper right section under Bootloader Installer Options, select (dot) Reinstall the Vista Bootloader, then click on the Write MBR button. (See screenshot above)

16. Close EasyBCD.

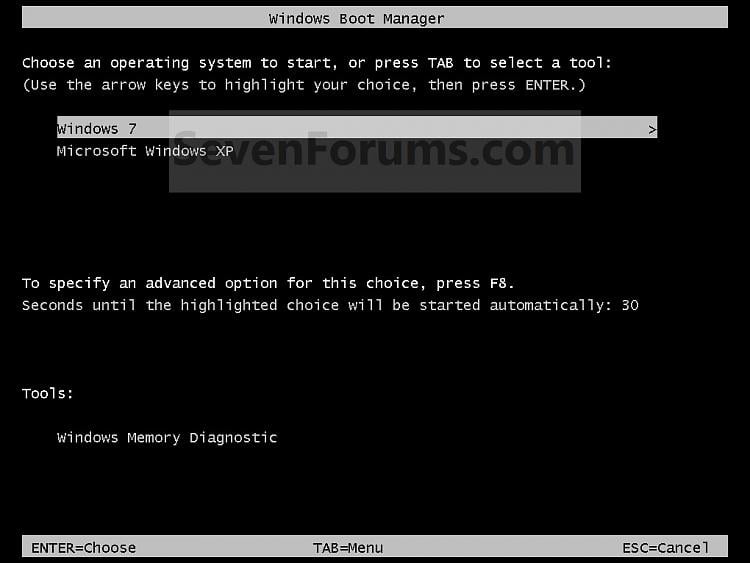
17. Restart the computer to have the option to boot from XP or Windows 7. (See screenshot below)Dual Boot Installation with Windows 7 and XP-example2.jpg

How to Change the OS Name in Windows Boot Manager

EXAMPLE: Windows Boot Manager
NOTE: This is an example of the default Windows 7 name (left) renamed to Windows 7 (build 7000) (right) instead. You can rename the OS to any name you like though.
Dual Boot - Change OS Name in Windows Boot Manager-boot_manager.jpgDual Boot - Change OS Name in Windows Boot Manager-boot_manager-2.jpg


METHOD ONE

Using the bcdedit Command
1. Start the Operating System (ex: Windows 7) that you want to change the name of in the Windows Boot Manager screen.

2. Open a elevated command prompt.

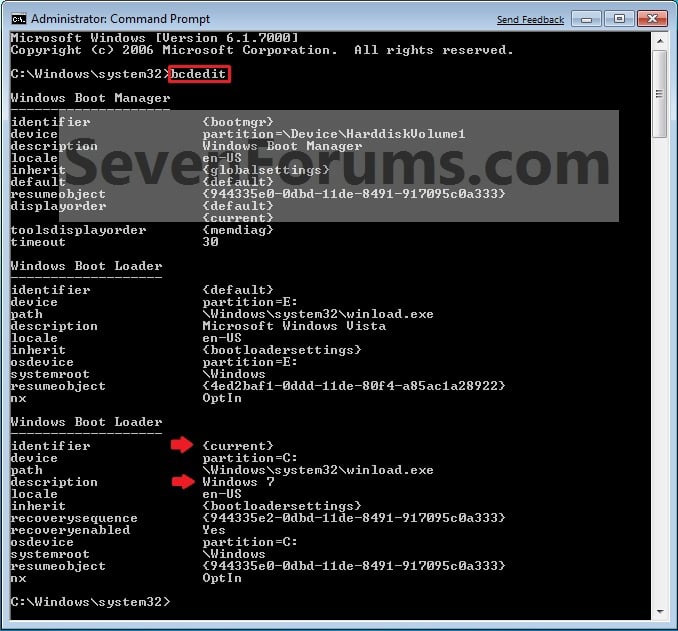
3. In the elevated command prompt, type bcdedit and press enter. (See screenshot below)
NOTE: This will let you see what the name of the {current} operating system name is. This will be the operating system that you are currently in (ex: Windows 7).
Dual Boot - Change OS Name in Windows Boot Manager-step1.jpg
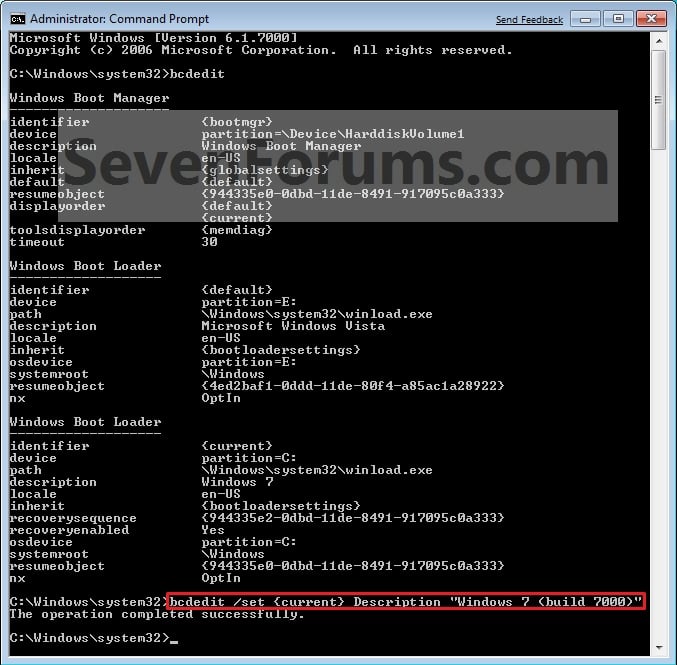
4. In the elevated command prompt, type:
bcdedit /set {current} Description "name you want"
and press enter. (See screenshot below)
NOTE: For example, if I wanted to change the name to Windows 7 (build 7000), I would type bcdedit /set {current} Description "Windows 7 (build 7000)" and press enter.
Dual Boot - Change OS Name in Windows Boot Manager-step2.jpg
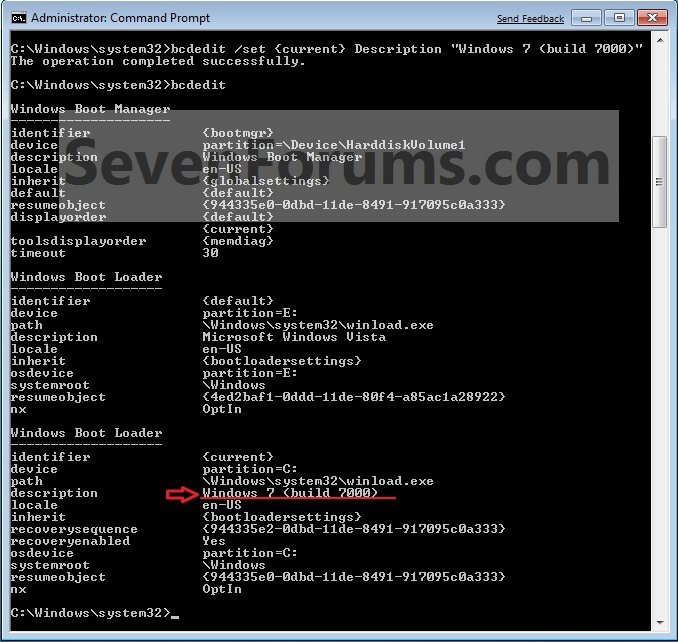
5. In the elevated command prompt, type bcdedit and press enter. (See screenshot below)
NOTE: This will let you see and verify the new name of the {current} operating system.
Dual Boot - Change OS Name in Windows Boot Manager-step3.jpg
6. Close the elevated command prompt.

7. When you restart the computer next, you will see the new name listed for the operating system. (See example screenshots at the top of the tutorial)


METHOD TWO

Using EasyBCD Program

NOTE: Special thanks to SIW2 for providing this.1. Download and install the EasyBCD program, then run it.
Dual Boot - Change OS Name in Windows Boot Manager-easybcd2009-01-23_142941.jpg
2. Click on the Change Settings button.

3. Select the OS whose name you want to change in the drop down arrow menu.

4. To the left of the Name line, click in the line to put the cursor there and type any name you want for the OS.

5. Click on the Save Settings button.

kunkun-laptop .... ;)